Equipment for back-country cookery: Tramping/Hiking stoves
There are a variety of ways to heat water and cook food while pursuing your outdoor adventures. The most obvious is the use of an open fire but due to the environmental impact this is now a discredited method. While open fires are not illegal they should only be used to cook food in an emergency.
 |
| Camp-fire cooking...as old as humankind. |
Instead there are a myriad variety of stoves specifically manufactured for back country use. I thought it might be useful to look at these various types and explain what I use and why.
So many types of outdoor cooker...
To start let us look at the types of cookers available. Note that the terms stove and cooker
are interchangeable, you call them stoves we call them cookers!
Iso-butane or gas canister stoves
The
most commonly used stoves are those using iso-butane canisters, these
are often refereed to as 'gas stoves'. A gas stove will consist of the
gas 'bottle' and a screw on cooker unit which you attach to the bottle. Please note
that the older 'pierced' type of gas canister is very difficult to find
in New Zealand, we all use screw on cookers.
 |
| Kovea Titanium Tramping Stove |
There are two main types of gas cooker, those that attach to the top of the bottle and those that are free standing. Above is a Kovea Titanium stove, this is typical of the top attached cooker. As you can see it has a perforated burner head, with a mechanism on the side to control the gas flow. There are fold out pot supports above the burner head. The button next to the Kovea branding is the piezo spark actuator.
 |
| Using my top fitting Kovea gas canister stove at Packhorse Hut, 2016 |
Below is the MSR Whisperlite, this is one of the free standing variety of outdoor cookers. These are much more stable as they usually have wider legs/pot supports arms and have a lower centre of gravity. The downside is the extra weight, these are normally 100-200 gms heavier than a top fixing stove.
 |
| MSR Windpro free standing gas stove for tramping |
Here is a different version of a canister stove, the
Jetboil. A Jetboil is an integrated cooking system with stand, cook pot, burner and canister all in one. You use a Jetboil to heat water...you cannot cook in these. These stoves are good for alpinists and mountaineers as they are fast (melting snow for water) and pack into quite a small package.
They are also expensive and heavy which is why more trampers, anglers and MTB riders don't use them.
 |
| The Jetboil outdoor 'cooking system' |
Iso-butane gas canisters are pressurised so the canisters must be made of steel to contain
the gas. This means the canisters are heavy. An
empty
225ml canister weighs 145gms so that is a lot of wasted weight you have to
lug around.
Disposing of empty canisters can be problematic. The empty canisters cannot be recycled in New Zealand
unless they are punctured- they need a hole in them to allow residual
gas to escape. If not completely empty they are liable to explode during the
recycling process.
 |
| Various sizes of MSR iso-butane gas: 100gms, 225gms and 550gms canisters |
Aside from the weight, gas canisters can also be expensive- they currently cost from $15-$20 for a medium sized canister. They do not perform well in cold conditions, as the gas can freeze if it is very cold. If using one in a cold alpine environment it needs to be kept warm in a sleeping bag overnight.
Pros:Easy to use, quick set up, fast heating ability, relatively cheap, moderate heat control, widely available, many different models/makes, three sizes of canister available in New Zealand
Cons:Fuel canisters are heavy, quite expensive, disposal of empty canisters is problematic, top fixing versions are unstable, not good at high altitude or in cold conditions
Multi-fuel stoves
As the name implies a multi-fuel stove can use a variety of different fuels, this ranges from gas canisters, stove specific fuel, kerosene and even gasoline at a pinch. Some makes will only use liquid fuels while others are able to use both liquid fuel and gas.
 |
| The MSR Whisperlite multi fuel hiking stove: Both fuel bottle and gas canister shown |
You fill the fuel bottle with your fuel of choice, then turn this into a pressurised gas by pumping the pressure handle. The stove is lit with match, lighter or piezo spark actuator.
Multi-fuel stoves are excellent for alpine conditions as the fuel is not affected by altitude or cold. Their ability to use a multitude of fuels also makes them practical: gasoline is available everywhere in the world while gas canisters are sometimes difficult to locate.
Unfortunately, these stoves tend to be heavy, 300-800 gms as opposed to a gas canister stove at 70-250 gms. They can also be a cast iron bitch to light as the burner unit is prone to soot blockages and fuel impurities. You must use good quality fuel and carry a cleaning kit and use both for optimum performance.
 |
| A MSR multi-fuel cooker service kit |
I have to say though, there is nothing like the sound of a multi fuel stove blasting away on a cold morning...to a lot of us older trampers it is the sound of tramping itself.
Able to utilise many different fuels, much hotter flame, better flame/heat control, work well at altitude and in cold conditions, sound awesome when fired up
Cons: Much heavier, more difficult to operate, fuel must be pre warmed and pressurised before use, can be hard to light, more prone to stove blockages
Methylated - Spirit stoves
Methyl alcohol or 'spirit stoves' have been around for a long time but have recently been undergoing a resurgence in popularity. Prior to the 1940's this type of stove used jellied fuel and was utilised in the Great War trenches: Luigi, Ivan, Tommy, Mustafah and Fritz all had them.
 |
| Reproduction of a World War One "Tommy cooker' |
Alcohol stoves can be commercially produced or home-made and have a burner unit with a series of holes in the top and sides. They normally have a stand to hold your pot above the flame and sometimes a wind-shield. Once lit the heating flame will come out of the holes providing the means to cook/ heat water.
 |
| A Trangia brand outdoor alcohol stove in action |
As you can see in the photo below they are quite effective but the do have a number of limitations. The heat put out by methylated spirits is low, so cooking times are much longer. Once lit the flame cannot really be controlled so these stoves are not ideal for simmering.
They are also easily extinguished by wind, you really need a wind shield if using a spirit cooker.
 |
| Home-made outdoor alcohol stoves made from aluminium cans |
These stoves will use both methylated spirits and de-natured alcohol, which is the
American name for a similar product. "Meth's" comes in 1 litre bottles in
New Zealand and cost from $6-$10 NZ dollars. Methylated spirits can be found in most
service stations, hardware stores and supermarkets.
De
natured alcohol is usually only found in the larger outdoor equipment
shops. It costs approximately $10-$20 NZ dollars per 1 litre bottle.
Just use meths' bro....
 |
| Methylated Spirits aka Denatured Alcohol |
Pros: Fuel is cheap and widely available, stoves tend to be quite light, fuel can be used for starting a fire (carefully...don't throw meth's on an existing fire), fuel weight is lower as no heavy gas canister to carry
Cons: Highly inflammable...the vapour only needs a spark to ignite. Not safe for use in huts, easily extinguished by the wind, often need a wind shield and stand for use negating weight savings, care needed when refilling, fuel only comes in 1 litre volumes so there is potential fuel wastage.
Solid fuel tablets- Esbit Stoves
Solid fuel stoves have been a mainstay of worldwide military forces for
most of the later part of the 20th century. There are many firms producing both stoves and
fuel including Sea to Summit, Coleman, MSR, Coghlans and cheap 'no
brand' versions from China.
The most renown brand of solid fuel stoves are made by the
German company
Esbit, so in Europe these cookers are called 'Esbit stoves'.
 |
| Classic Esbit stove from Germany |
The solid fuel tablets for an Esbit type stove are generally made of a compound called hexamide. Hexamide is highly flammable and hence relatively easy to light. It is basically a solid form of hydro carbon covered in wax to stop it evaporating. One if its downsides are the fumes it exudes: these are both poisonous and foul smelling.
 |
| Classic Esbit fuel cubes- one cube = 12 minutes of burn time |
The beauty of solid fuel is that you need no stove...when I was in the military we just used a couple of rocks or sticks to prop our mess tins above the burning fuel cubes.
Oh my god... the smell of a 'hexie' tablet cooking some 'Spag and Snarlers' 'Corned Beef Hash' or 'Meat and Vegetables' is something every ex service person will remember fondly...morning time means hexie time!
An Esbit stove is bullet proof: it has no moving parts, requires no servicing and can be stored forever. That's why the military used them for so long.
Pros:No parts to break, can be stored till the end of time, need no cooker, slow steady heat, relatively light, can be lit when wet, fuel makes excellent fire starter so dual purpose, cheap (a stove and fuel is usually less that $10 NZ dollars.
Cons: Low heat output, noxious fumes, cannot be used indoors, not readily available except in outdoor stores, easily extinguished by wind
Portable wood stoves
One
of the newer forms of stove in use are those that use wood as their fuel...much
as our ancestors have done for the last 40 000 years. These are
commonly aluminium or titanium and burn paper, sticks, leaves and small wood chips.
There are many commercial versions but these can also be made by the outdoor hobbyist at home.
These
are most often used by survivalists, long trail hikers and in areas
where other stove types are banned. I see very few people using them in
New Zealand- it is wet here so little dry wood and there are often fire bans
in place over summer.
 |
| Typical lightweight outdoor wood stove in action |
The beauty of these stoves is that fuel for them is all around you, all the time. They can burn paper, card, wood, coal, dry grasses, dry leaves....basically anything that burns and is dry.
Pros: No need to carry fuel, relatively lightweight, inexpensive if home-made, can be used in most outdoor situations, fold down versions take up little space
, environmental impact slight
Cons: They require dry wood, can get very sooty on the outside, fire risk- cannot be used if there is a fire ban, cannot be used in huts, bulky unless fold down design, commercial versions are expensive
Flameless Ration Heaters or FRH's
Flame less Ration Heaters (or FRH's) are a by-product of military style Meals Ready To Eat (MRE's). MRE's first came into use with the US Army in the late 1980's to replace heavy canned rations.
 |
| US military FRH from a Meals Ready to Eat (MRE) |
An
MRE (jokingly called, with usual soldierly humour: Meals Rarely Eaten) is a
thermo stabilised retort pouch of food, with the addition of various
drink powders, snacks, side dishes and accessories.
 |
| Flameless Ration Heater: the chemical heater pad in a FRH |
They are a one meal item i.e. you would need to eat three a day to get your recommended calories. The FRH they contain uses a thermo-chemical reaction to warm the main meals and any hot drinks. Most of the military forces of the world are now using these.
 |
| A US military MRE: Beef Pasta with Tomato Sauce |
FRH's were specific to military circles until about 10 years ago when a number of outdoor companies started to produce them for hikers and campers. Back Country Cuisine are the only indigenous manufacturer of FRH's. You have to be careful with an FRH, these can get really hot to the touch- don't leave them on an unprotected tent floor!
 |
| A Back Country Cuisine Flameless Ration Heater |
In New Zealand the commercial food ranges these FRH's can be used with are Kaweka Meals (also used by the NZ Defence
Forces), Sun Rice meals and the MTR range of Indian meals. All of these come in thermo stabilised pouches. Freeze dried meals can also
be heated if the contents are re hydrated with cold water first.
Pros: Very lightweight (less than 20gms each), easy to use, you require no stove/fuel or pot if not heating water, can be used in a well ventilated tent, not affected by cold/wet/windy conditions
Cons:Horrible environmental impact, very slow heating, expensive, limited uses- only good with thermo stabilised retort pouches, hard to source in New Zealand, need salt and a cup of clean water to work.
No heat/no cook tramping
One way to deal with cooking while tramping is to simply go without. I have meet a number of people practising no cook (or stoveless) tramping. Instead of your traditional hot meal they only utilise cold foods that require no cooking.
Typical 'no cook' foods might include: cold meats, canned fish, cheese, jerky, wraps/tortillas/bread/crackers, various spreads, energy bars, cereals, dried fruit or it could be dehydrated meals reconstituted with cold water.
Basically the sort of stuff you eat for lunch!
 |
| Some no-cook menu items: cereals, scroggin, energy bars, tuna, salami, drink powders, dried fruit etc. |
I've tried this on an multi night tramp and decided it is not for me. I like a hot drink in the morning with breakfast and soup and a hot meal at night. In extremis I would go stove-less but not out of choice. That's just my personal opinion by the way...you need to decide what works for you.
I meet a guy on the St James a couple of years ago who had scroggin, whiskey and 24 peanut butter sandwiches for food- he had six sarnies per day- two per meal. Hey...it would keep you going, but....
 |
| Do you fancy this at every meal for four days.... |
Pros: Lightweight (no stove/pot/fuel/cutlery), cheaper option as not buying fuel, stove or cook-pot, easy to sustain yourself for short periods this way
Cons: 24 peanut butter sandwiches......who wants to eat that for 4 days in a row! Will not sustain you properly for more than a couple of weeks, could be unsafe if tramping in adverse weather conditions (hot drinks save hypo-thermic trampers as they used to say...), packaging...there would be a lot of it!
My personal choice of tramping stove
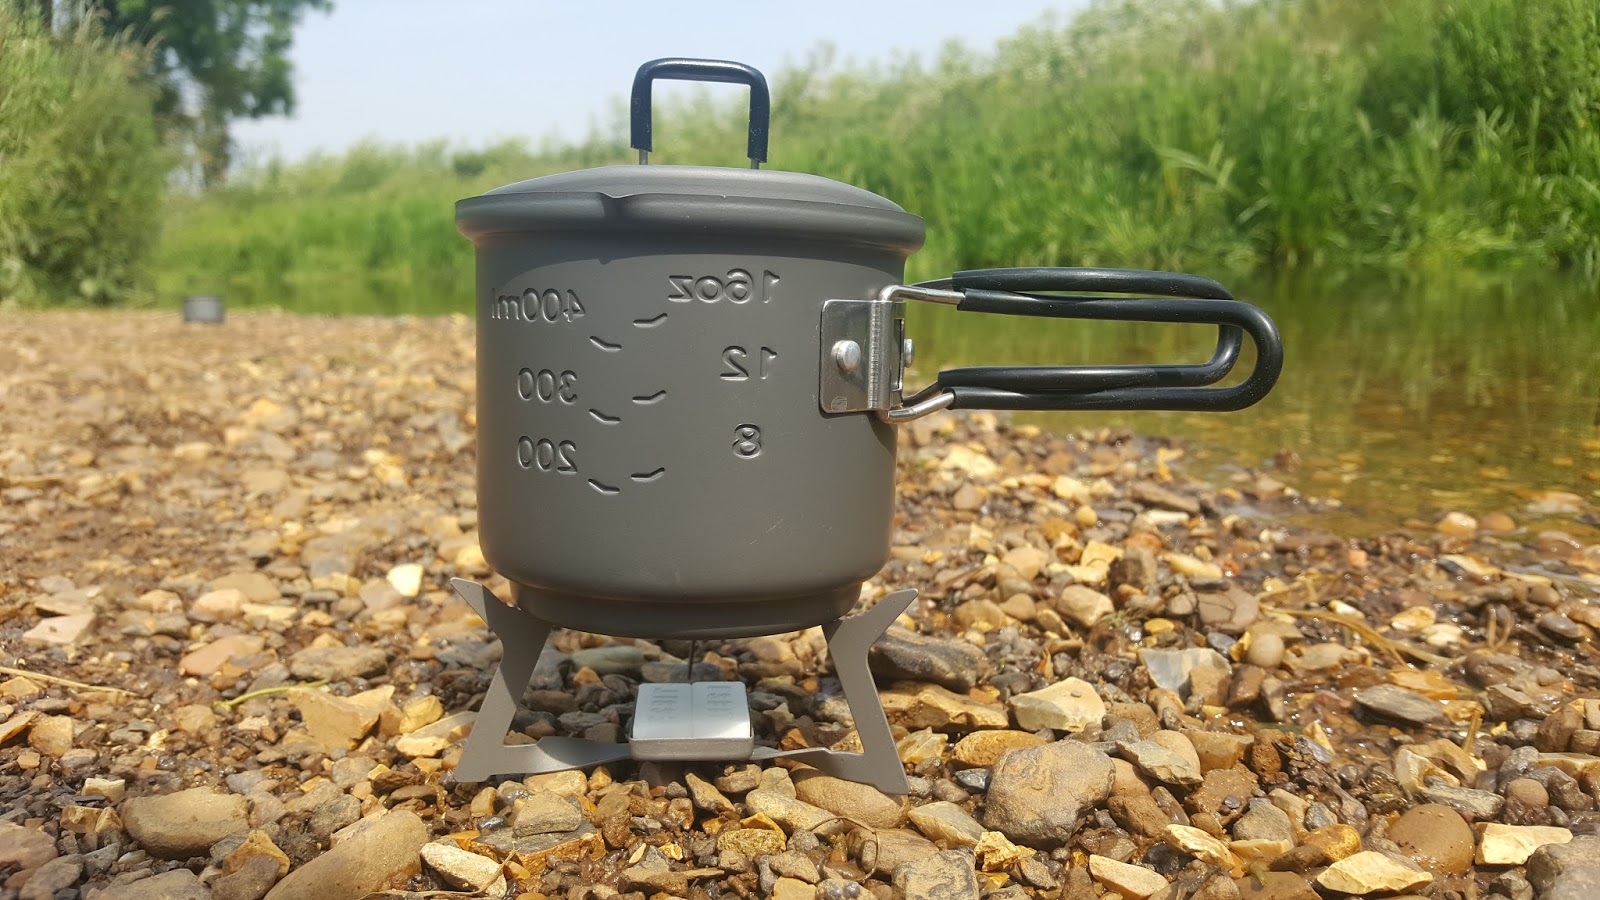
I've used all of these various cooker types before but my primary cook stove is a relatively new titanium Firemaple screw on canister stove. This stove is very light....it weighs under 90gms including the hard plastic case it came in. This compares to older Kovea stove at 120gms without the case.
 |
| My newish Firemaple Brand iso-butane stove... |
I brought this stove from
Complete Outdoors a local online gear shop, it cost about $60 NZD. The cooker has quite a large burner head and expandable pot support arms that fit my titanium pot very well.
Firemaple is a Chinese company..the Chinese are starting to make real inroads into the outdoor gear market I can see a time when all of the best outdoor brands will come from there.
 |
| Burner head and foldable arms on my Firemaple stove |
I also own a Kovea Backpacker gas canister stove. I have been using this stove since 1993 with great success and it is still going strong. I like this stove but it is hard to argue with the weight savings of using the titanium Firemaple.
 |
| The Kovea Backpacker stove...this is the 2016 version |
I usually couple my stove's with a medium size MSR gas canister, this
combination allows me to boil water for both breakfast and dinner for 4-6 days. Both stoves cool fast and both have larger diameter burner heads which I find advantageous when heating speed is of the essence.
 |
| My Kovea Backpacker stove in use at Nina Hut in 2016 |
Why gas....? I just find it more convenient to use a canister stove. You can have it out and going in less than one minute. A good breakfast is a fast breakfast if you know what I mean...! Any other type of cooker involves too much buggering around to get it operational.
 |
| Fixing dinner with my Kovea tramping stove at Mid Robinson Hut, 2015 |
If you are going to be using a canister stove you need a Crunchit. A
Crunchit is basically a big can opener which allows you to safely puncture canisters to vent residual gas. The 'empties' can then be recycled. I leave mine at home and take to my empties after the trip.
 |
| The Jetboil Crunchit recycling tool |
I also carry two Esbit cubes with me on every trip as an emergency backup. As I said earlier these can be used without a stove and because they only weigh 5 gms each are a useful survival tool. It is not without precedent to run out of gas for your cooker on the last day of a longer trip, so...two meals worth of hot water.
 |
| My Esbit cubes: fire starter and emergency cook tool |
I have not had cause to use them for about 2 years now.
A gallery of other tramping stoves I own...
I have an Esbit methylated spirits cooker which I will be using when I do some of my longer Te Araroa Trail sections because it is ideal for that kind of tramping. The fuel is cheaper and more readily available in out of the way places.
 |
| My Esbit cooker looks like this... |
I inherited a Kovea Hiker stove from one of my brothers who moved to the US, it is an older design but still works well. She is a bit hefty for tramping but folds up into a nifty hard plastic container.I would use this stove if car camping or as a base camp stove.
 |
| Kovea Hiker stove, mine does not have a piezo |
I also have an Outer Limits Huntsman stove, which I brought when I got back into tramping in 2010. I really like this stove but I just have a sentimental attachment to my Kovea Backpacker so this one doesn't get used very often.
 |
| An Outer Limits Huntsman stand alone stove |
I hope that gives you some ideas to consider when choosing a new tramping stove.