Showing posts with label Tramping Equipment. Show all posts

Tuesday 21 March 2023

Tramping Equipment: Soto Windmaster stove

 Review of the Soto Windmaster Stove

So...I bought a new outdoor stove last week...it is the Soto Windmaster. I have read some good things about this stove and felt the need for some retail therapy so...! I am a big fan of canister stoves and I’m not alone – the overwhelming majority of trampers I come across use them. For price point, ease of use and efficiency they are hard to bet.

BTW: this is my tenth outdoor stove...I think I might have a problem! 

Soto Windmaster fixed to a medium sized gas cannister

There are a large number of models available on the New Zealand market and a huge number more available from overseas. There are a handful of well known brands and models that dominate – the Soto Windmaster is one of those.

Some of the Soto Range of outdoor stoves


 At NZD $135  this model sits at the upper end of the price range for canister stoves. Having said that there are good reasons for this. Firstly all stoves sold on the New Zealand market have to meet the requisite gas standards and this does add to the price but also increases the safety

...the box your new Windmaster comes in...

Soto is a well known and highly regarded outdoor equipment manufacturer with a wide following around the world. The Soto Windmaster has a large range of features and a high level of performance that many of the cheaper stoves lack. All this amounts to a more expensive stove but given the features it is very good value for money.  

So let’s look at the features on this great little stove unit.

Some of the main features on the Soto Windmaster

This stove is called the ‘Windmaster’ for a reason and that’s because it copes very well in windy exposed conditions. The stove has a piezo-electric starter so it is a self contained unit and is easily started even when windy where matches or a lighter don’t work. This starter works a charm and one press is all you need to spark a flame.


Centrally located ignitor on the Soto Windmaster

 At 89 grams for the stove unit itself and 100 grams including the small carry bag, this stove isn’t the lightest in the stove market but doesn’t weigh that much. It compares favourably with its contemporaries like the Kovea TI stove, MSR Pocket Rocket and my Fire Maple TI stove which all weigh around 70-80 gms. 


Windmaster comes with a nylon carry bag

To be fair when you compare this to all in one integrated stove types you do need to include other items such as a pot, gas canister and canister stabiliser which will increase the weight. I will be using my standard Toaks 1.3 liter Titanium pot on this stove but it will also work with my other cookware. 

My Toaks 1.3 liter pot i usually carry


Being able to buy a cannister stove as a standalone unit allows trampers to mix and match to get the system they want and the opportunity to change the pot choice depending on your needs. Sometimes you will be fine with a small cup/pot or you might need a big 2 liter pot or a frying pan. Flexibility in gear choice is ideal when buying outdoor equipment. 

Soto Windmaster with pot stand attached

The head on this stove is large as far as canister stoves go and and sits very, very close to the pot allowing just enough airflow to provide oxygen to the head but not so much to impact the flame. In fact the burner head is slightly recessed providing additional wind protection. Most canister stoves need a windshield  to operate well in windy conditions and while this will benefit any canister stove it is not essential for the Windmaster. 


Burner head designed to resist wind...Windmaster

This stove has been tested and it will boil 500 ml of water in less than 2 minutes and 45 seconds with a light breeze. This is slower than an integrated stove but not by a great deal. FYI: Integrated stoves are all in one packages and include ones like the JetBoil and MSR Windburner range. If you are using the Windmaster (or for that matter) any other stove during windy weather the boil time is going to be slower.


The MSR Windburner is one type of integrated stove system


This unit is unique compared to most other canister stoves in that the pot stand is not attached but comes as a separate unit. This does make it more fiddly to use because you have to attach it to the stem of the stove itself. This can be overcome as the pot support can be permanently attached to the stove and will still fit inside the provided storage bag. 

Pot stand comes separate from the stove itself

 It’s a reasonably wide pot support, larger than most, so will cope with larger pots and saucepans provided you have a canister stabiliser attached. One of the big benefits of canister stoves in general is that they simmer food really well so if you are going to be cooking rather just boiling water then they are a great option.

Wide stand arms will accommodate larger pots/pans

A feature I like is the ignitor...it makes the stove much easier to light. Even my $300 dollar MSR Windburner does not have an ignitor on it so I appreciate its inclusion. I would still carry a lighter or matches as ignitors can wear out after heavy use. A stove is useless if you cannot light it so an alternate means of ignition is a good idea. 

Soto Windmaster in use

Overall the Soto Windmaster is a great stove with plenty of wonderful features and while on the upper end of the price range, it is well worth considering if you after a canister stove.

The Windmaster in Use:

The windmaster will be coming on my tramp around the St James Walkway next week so look back for some photos of the stove in use...

Heating water for breakfast at Ada Pass Hut

Cooking bench at Anne Hut on the St James Walkway

Man...this stove is a cracker. It worked really well on my recent St James Walkway trip and I think it might become my go to stove for most of my tramping trips. It is fast, efficient and easy to use all things you really want in a camping stove. Time will tell how it performs over the long term but I really like it. 

Sunday 5 March 2023

Tramping Equipment: Orson Indie 1P UL Tent

 Another tent for the tramping equipment cupboard

Over the weekend I brought myself a new tramping tent to add to my already extensive stable of shelters. It is the one person Orson Indie 1P UL Tent which is another lite weight shelter for use on my tramping and back country adventures. 

The Orson Indie 1P UL tent

Orson tents are made in conjunction with Intents Outdoors an Auckland based importer of outdoor equipment. Orson is their new in house brand manufactured overseas to NZ specifications. Intents Outdoors have existed from the mid 2000's and provide a range of outdoor gear including tents, shelters, camping gear, camp kitchen and car camping items. 


The Intents Outdoors website

The Indie 1P UL is a tarp shelter which means it can be erected with a treking pole or optional tent pole. I always carry a set of trekking poles so it makes sense to use a tarp tent as a lite weight shelter. The Indie 1 weighs in at just over 1 kg and is long enough, wide enough and tall enough to provide space for myself, my sleeping pad and my gear. 

Dimensions of the Indie 1P

The Indie 1 is a pyramid style tent with a outer fly with a 4000mm water rating and a 8000mm rated floor. It will have significantly more water protection than my Big Agnes tent which will allow me to camp further into the summer shoulder seasons. 


Indie 1P UL tent in green...side view

The tent is available in either bright orange or a mid green color (mine is green) and they are a combination of sil nylon, polyester and netting material. It has one vestibule and one opening and needs to be pegged to the ground to erect. The outer fly and inner tent can be erected separately, together or outer first so the inner can be kept dry if erecting in rain. 

You can also buy the Indie 1P in this bright orange color

The tent packs down to a relatively small size and has its own waterproof stuff sack for storage when not in use. There is a set of 9 Y shaped aluminium pegs and I will replace 2-4 of these with longer V stakes for the foot and head. 

The Indie 1P comes with a waterproof drybag

The inner dimensions of the Indie 1P are roughly the same as my Copper Spur UL 1 and like that tent this is a single person shelter. The Indie is a little bit taller so I will have to take some care when pitching as it will probably be more prone to wind.  This is a minor problem for me as I do not often pitch my tent on exposed hills. 


I have seen a number of other people using this tent here in New Zealand and it is the main shelter of one of the tramping vloggers I like to watch. I brought this tent from Hunting and Fishing at Tower Junction and it cost $350 NZ Dollars. This is the first time I have seen these tents here in Christchurch and H & F had a good selection of the Orson tent range in stock. 


There are two optional additions to this tent with either a metal or carbon fiber pole available and a ground sheet cut to the correct dimensions for the tent. I have ordered a metal pole for the tent but I'm not sure if I will order a ground sheet to go with it. The pole cost $30 from Intents Outdoors an online store here in New Zealand.

I have already ordered one of the optional Indie metal poles

I usually cut some plastic sheeting to size for a footprint and use this as it it is lighter and more durable than a nylon groundsheet. I have also used Tyvek and space blankets for ground sheets in the past so I will have to decide what I want to use with this shelter. 

Optional Indie1P footprint is about $60 NZD


 I am looking forward to getting this out and into the backcountry to see how it performs. 

The Indie 1 in use...

There is nothing to see here yet as I have not had the opportunity to pitch the tent. 

Here are a couple of photos I found showing the tent pitched. This particular instance is using the optional metal pole you can purchase for this tent and a treking pole. I have already ordered one of the poles from Intents Outdoors and I expect it to arrive in the mail sometime this week. 


Side view of a pitched Orson Indie 1P using trekking pole

Another view of a pitched Orson Indie 1P with metal pole

I will be taking this outside and pitching it as soon as we have some dry weather so I can practice raising and lowering before I need to use it on a tramp. I will add some photos to this post when I have been able to do so.

Tuesday 28 February 2023

Tramping Equipment: Sea to Summit Ultralight Insulated Sleeping Mat

 A new Sea to Summit sleeping mat for 2023

Here is another new piece of kit Karen brought me for my birthday back in August of 2022. It is a Sea to Summit Ultralight Insulated sleeping mat. I have already used this beauty and it made for a comfortable night's sleep.

Sea to Summit Ultra Light sleeping mat

Sea to Summit are one of the larger outdoor gear brands and they make a range of tents, packs, sleeping bags and other outdoor kit for the backcountry adventurer. I have quite a bit of their gear mostly cooking equipment like cutlery, plates, cups and mugs but this is the first sleeping mat I have owned from this company.

Various inflation settings for the Ultralight Mat

The Ultra Light Insulated comes in a number of sizes from X-Small through to Large. My mat is the large size and it is plenty wide and long enough to fit my 6'3" frame onto with space to spare. 

Sizes in the Ultra Light mat range compared to a water bottle

Part of the comfort and warmth of the mat is provided by the air cells in the mat. They make small pockets of air under you as you are laying on it which protect you from the ground. The mat has a soft finish to the outer material and it was reasonably quiet when you roll around on it at night. 

Air cell construction adds comfort and warmth

When packed the mat is about the size of a large Nalgene bottle so it is a compact item. There is a stuff sack/pump bag for inflating the mat which is becoming a standard feature for most sleeping mats. It only required five bags of air to fully inflate so it is a breeze to use. 

Ultralight mat compared to a drink bottle

My mat has a insulation layer inside and its R-Value (or measure of how warm it is) is 3.1. This means it would be good to down around 2 degrees Celsius but it would not provide enough warmth for temperatures lower than this. The R-Value can be extended by adding a foam mat underneath but you should really be looking at a mat with a 4.5 or above R-Value for proper winter camping. 


The Ultra Light Insulated has a 3.1 R-Value

This mat would be best suited for use in summer and the shoulder season either side so here in New Zealand that would be from November through March. When inflated it is about 2" thick (5 cm) so it is actually quite comfortable to sleep on. It is thick enough for people like me who sleep on their side to keep your hip up off the ground. 

Technical specifications of the Ultralight Mat

My mat is 600 gm's in total which is not super light but is quite competitive when compared to other brands like Klymit and Thermarest for the same size and R-Value. Sea to Summit are certainly cheaper with this mat retailing for around $320 as compared to the $550 price for a NeoAir XLite from Thermarest. 


All in this looks like a really good sleeping mat and I look forward to using it in the future. 


The Ultralight in use...

So far I have only used this mat on one trip which was my Hawdon Valley camp back in January. As I said at that time I am looking to do more camping trips before I get to old to handle them. My intention is to do several tramping trips a year solely as camping tramps as well as some overnight "Wild Camping" trips.  

Jon on his camp in the Hawdon Valley

The sleeping mat performed well and I had a good nights sleep using the mat and my Big Agnes Tent. It is an excellent summer weight mat and it could probably be used down to temperatures around 5 degrees with ease. It was 15 the night I was out and I was actually a bit warm...

Sea to Summit Ultralight mat in the Big Agnes tent

The mat fitted into my one person tent and it is a good size to allow me to store gear at the head of the tent with the mat laying flat on the tent floor. For most of the day I had it folded up or stashed behind me so I could sit on the floor of the tent to read, cook etc. 

Gear packed on the last day of the Hawdon Valley camp

This will now become my go to summer sleeping mat and will replace my older Pacific Outdoor mats I have been using for the last 10 years. I am still in the market for a warmer autumn/winter sleeping mat and I am looking at another Sea to Summit product the Ether Light XT. It has a slightly higher warmth rating and is 10 cm's thick so it would be more comfortable. 

The Sea to Summit Ether Light XT sleeping mat


As always cost is a factor i.e. I need to save up some money to be able to buy another mat so we will see what happens. Keep an eye out for future trips where I am using this piece of equipment. 

Monday 20 February 2023

Tramping Equipment: Lixada alcohol/wood stove system...

 ...more goodies for the gear cupboard...

I received another new piece of kit just after Christmas and it is a real beauty. Karen and I were talking about alcohol stoves one evening and about a week later she presented me with a wood/alcohol stove she purchased from AliExpress. It was the Lixada wood and alcohol stove system.

My Lixada wood/alcohol system

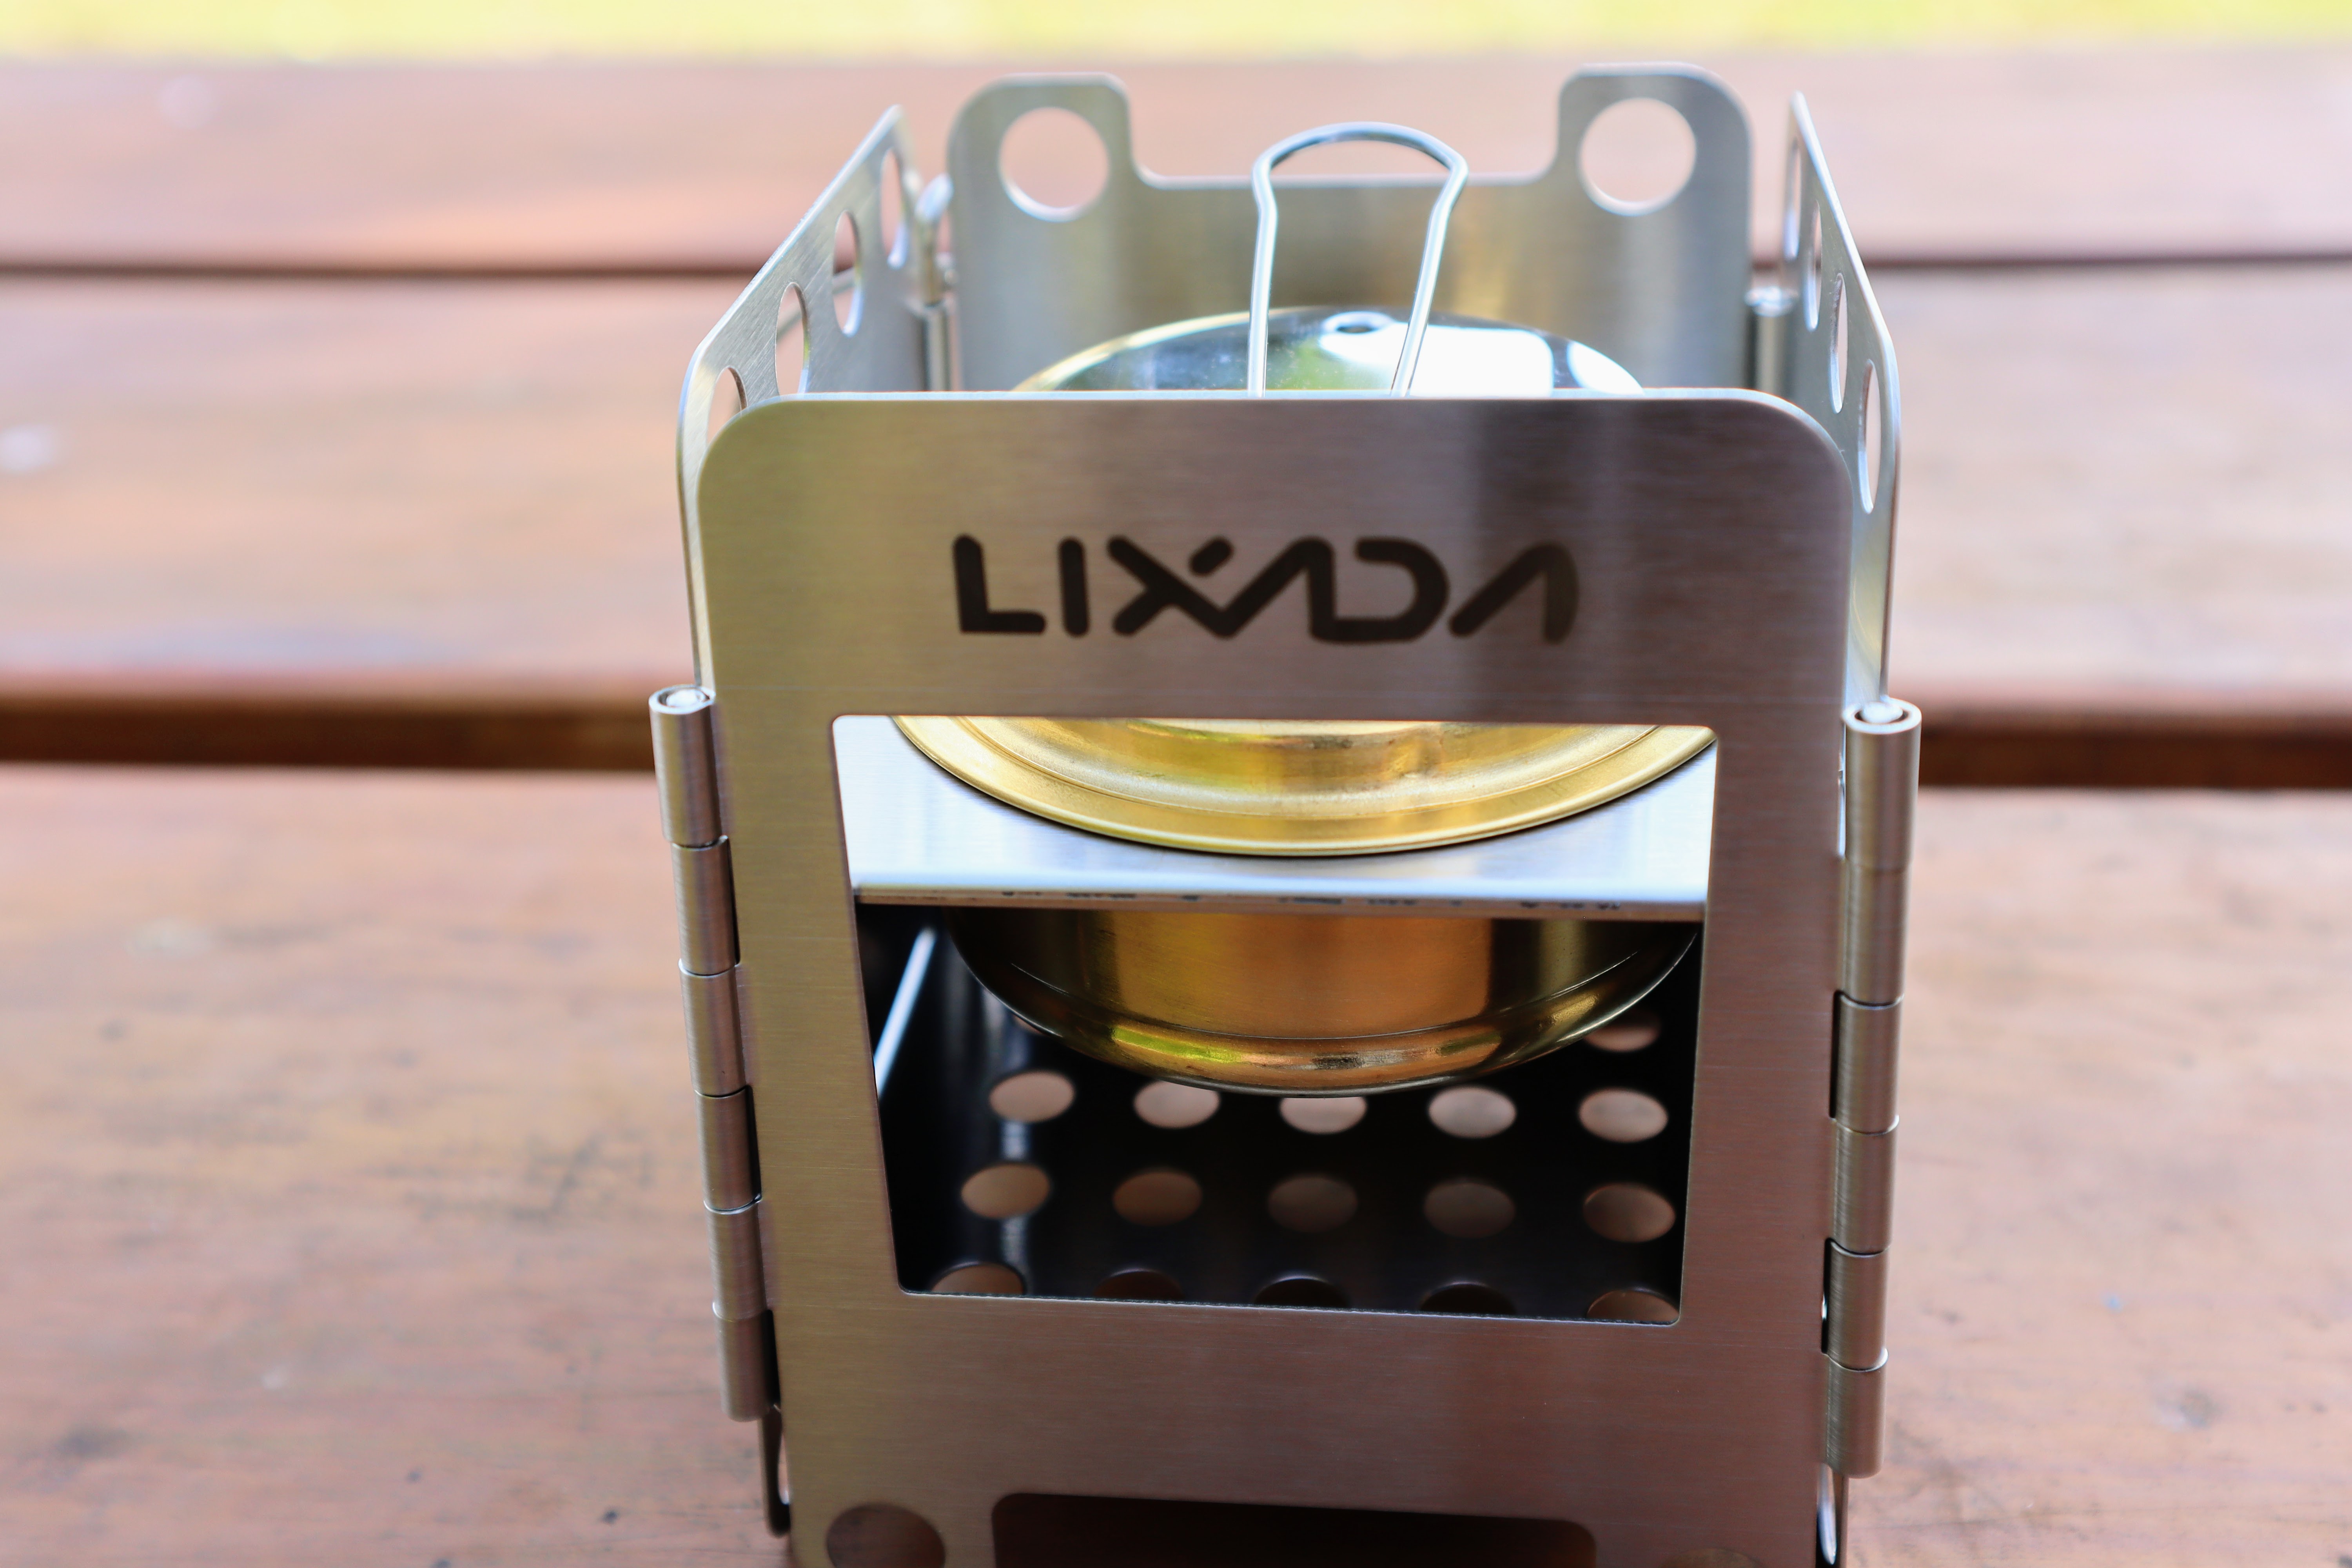
The Lixada company is based in China and they produce commercial cooking equipment and outdoor gear both for their own brand and others. They make a range of cookers, stoves and outdoor dining equipment in a variety of materials. 

Brass alloy cooker from Lixada

Their products are readily available on AliExpress, Amazon, Trade Me and from their online store. I have never seen any of their products in stores here but that is not uncommon with these smaller niche producers. 

While Trangia are the most respected producers of this kind of stove there are a multitude of smaller cottage companies producing good outdoor cooking equipment. Quality is often comparable to Trangia without paying for the name/brand on your gear.

Lixada fit right into this category...

Cooker can be sealed with a cap

I thought we could have a look at my stove and see what the build quality and features are...


The Lixada wood/alcohol stove:

The stove comes as a complete package but the individual components can be purchased separately if required. This kit consists of a stainless steel wood stove which also doubles as a stand for the Trangia style alcohol stove. 


Lixada system: part one is the alcohol stove

Lixada system: part two is the wood stove/stand

The wood stove is of the folding type and can be folded down into a square approximately 12 cms by 10 cms. There is an outer frame and two shelves which fit inside the frame to act as grate and alcohol stove holder. There is an attached pin which fits through a hinge to hold the whole stove together. 


Lixada wood stove with shelves inserted

Detail of the Lixada wood stove

Lixada alcohol stove fits in the top shelf

The alcohol stove is the classic Trangia style with a brass alloy burner with a cap and simmer ring. The burner can be filled with de-natured alcohol, Methylated Spirits or alcohol gel to preference. Once lit the simmer ring allows you to regulated the size of flame and hence the heat. 

The shelves can be detached from the main stand

There is a separate shelf  that is designed to hold the alcohol burner unit at the right height to heat a pot, frying pan or cup. The whole kit weighs in at 340gms empty which is a decent weight compared to some cannister stoves or pressurised gas stoves. 

There is a Titanium version of this stove system which would take that weight down below 200 gm's but of course it is more expensive. 


Lixada wood stove with alcohol stove inserted

Both items fold down into small packages and both have a supplied carry bag to protect your gear from soot you might get on the outside of the cooker. You could easily carry the stove in its two bags but I am exploring an alternate carry method...probably a separate 1-2 liter canvas or nylon bag which would hold the stove, cooker and a small bottle of fuel. 


Both Lixada items have a carry bag

The stove can also act as a smaller twig/stick burner with a separate shelf to build your fire on. These type of burners are light as they require no fuel to be carried or separate burners. You just find small, dry sticks and twigs when you stop for the day and light a small fire with them.  

Lixada stove configured for wood

Obviously the disadvantage of this is you must find dry wood which would sometimes be quite tricky in our damp Beech forests. You also need to maintain the fire just like you would a wood burner in a hut...you cannot just leave this and walk away. 

I am not a great fan of wood stoves but I will be using this function in the future. 

You can leave the top shelf inserted using wood 

The alcohol stove comes in three pieces...the main cooker body, a cap and a simmer ring. All are in the same brass alloy and they screw or clip together to form one compact package. 

Lixada alcohol stove components

There is a simmer ring for the Lixada stove

Lixada stove...cap off and simmer ring attached

The alcohol stove can accept a number of different fuels including de-natured alcohol, Methylated Spirits and alcohol gel. Meth's is readily available but the gel and de-natured alcohol will only be available from specialist stores in the larger centers. I will primarily use Meth's in my stove. 

Methylated Spirits is the main fuel for the stove

One liter of Meth's is about $3.50 NZD

I was using my old NZ Army cups canteen when I was filming this vlog (it was the only thing I could find) but it is not the ideal pot to use with this stove. It is a bit too high and narrow so the flames tend to curl up the sides. A large diameter and low pot/pan would work best...


My US pattern cups canteen on the stove

A round pot/pan would fit the Lixada stove better

This cup is old...I got it from the NZ Army back in 1987 and I have used it since. Versions of this cup have been in use from the late 1940's right up to the present day and I think it shows the soundness of the original design that it is still useful. This particular pattern is from the Vietnam War era (mine has a manufacturing date on it of 1972).

US cups canteen...over 40 years old now!

The Lixada wood stove is of a folding design and the frame is held together by a pin that fits into an open hinge on one corner. It has a length of wire attached so it can be secured to the frame. If you ever lost the pin it would be easy enough to fashion a new one from some wire.


Preparing to disassembly the Lixada stove

Here is the Lixada wood stove disassembled into its various parts...there is the main frame, a pin and two shelves. You remove the pin and then fold down the main frame into a flat shape using the hinges on each of the corners. The components then fit in the nylon pouch provided with the kit. 

Individual components of the Lixada wood stove

...this pin holds the wood stove together...

Shelf for burning wood on the Lixada stove

Folded up Lixada stove ready for storage

All the necessary elements of the Lixada system

This is a decent looking stove and I decided I would find an opportunity to use it as soon as possible. 


Using the Lixada alcohol stove:

There was a fire ban at Kaituna Reserve where I was taking these photos so I could not trial the stove there. It has been hot here in Canterbury and all of the grass and under growth is super dry. I don't fancy the moniker of "man who burnt down 600 year old forest' attached to my name... 

There was a fire ban at Kaituna Reserve

Instead I drove over Gebbies Pass on the way home and stopped at the Allandale Reserve near Governors Bay. There was no fire ban here so I sat at one of the picnic tables and fired up the stove. 

Allandale Reserve in Lyttelton Harbor

I was only using Methylated Spirits this time but I will take the stove out soon and try it burning sticks and twigs to see how it works. 

Kit needed to use the Lixada stove system

Boiling water on the Lixada stove...alcohol stove being used

I filled my cups canteen and set about boiling some water to hydrate a Cup Noodle I had in my bag of gears. I would probably use this stove for heating water so boiling a litre and then making some noodles seemed like a good trial. 

Alcohol stove lit and heating my noodle water

...Alcohol stoves have a slow boil time...

These stoves are not the most efficient means of heating food or water. In all it took nearly 7 minutes for the stove to heat up a liter of water in my old cups canteen. If I was using a wider more shallow pan it would heat quicker but you would still be looking at 5-7 minutes to boil. 

Water starts to boil in the Lixada stove

Eventually the water reached a boil and I used the supplied simmer ring to douse the stove. There is a useful handle on the ring to make it easy to place it over a flame. You need to wait for the stove to cool before screwing the cap back on as it gets really hot. If you do it too soon you will melt or perish the rubber O ring on the cap which makes it leak proof. 

Flame doused using the simmer ring

These Fantasic Noodles need about 5-10 minutes to fully hydrate so cover them back up with the lid and leave them till they are ready. 


Water added to my noodles from the cups canteen

Once cool the alcohol stove can be removed

This photo shows how the pin holds the whole unit together...it has a large coil of wire on the end to make it harder to loose. If you ever lost the pin it would be easy enough to fashion a new one from a length of heavy grade wire. 

Note: Pin holding the stove together

After use the wood stove folds down into the nylon pouch supplied with the kit and it is a compact item to put into your pack. I will be buying a new bag for this stove so that I am able to carry the wood stove and the alcohol cooker in the same bag. 

Lixada stove folded and ready for storage

Detail of the top of Lixada alcohol stove

Fantastic Noodle time....I like these noodles but they are nowhere as good as a genuine English Pot Noodle. You can sometimes buy Pot Noodle from supermarkets here in Kiwiland but I haven't seen any for a while now...Tomato and Beef are my favorite. There are also some cheap off brand local versions available as well as good quality Japanese and Asian noodles here in New Zealand. 

Bon apetit folks...!

This is the sum of all the items you need to use this stove...the stoves, alcohol and wood. I am in the market for a small resealable bottle to carry my Meth's in and I will be looking for one that holds about 500 mls of fuel. That would be enough for 5-6 boils...


Final look at the Lixada stove system

This is a decent stove system and I will taking it out on a few excursions going forward. It is probably best suited for camping trips when I have time to spare for the slow heating times. I will be sure to showcase it the first time I take it out for an actual trip. 


YouTube: A look at the Lixada Stove System

                 Lixada alcohol stove in use