A roundup of required tramping gear...New Zealand edition!
If you are new to New Zealand or tramping it is a good idea to know what kind of gear you need to take with you. The length of your trip and the activities you intend to undertake play the most important role in deciding what gear you carry. Obviously going on a short walk requires less gear than a hard core multi-day tramp.
 |
| Equipped for a day walk...walking the Bealey Spur Track in 2015 |
Another factor to consider is the climate and terrain you expect to encounter...what height will you reach and how will this affect your gear needs? Do you require specialist cold weather clothing? Is an ice axe and crampons needed due to ice and snow? Will specialist climbing gear be required? Is there a large storm front due in the next couple of days and what will this mean to your plans?
Through planning is required to ensure you have the right equipment to survive in our harsh environment.
 |
| Ice axe and crampons..extra weight but vital gear in snow and ice... |
Imagine the worst case scenario, you fall and incapacitate yourself...you are stuck where you are. Will the gear you carry allow you to treat any injuries, alert the authorities and keep you alive until they arrive?
If the answer to any of these question is NO then you are ill equipped.If you cannot survive for 24 hours with the contents of your pack then you need to rethink your gear list.
The golden rule is to be totally self sufficient!
If the answer to any of these question is NO then you are ill equipped.If you cannot survive for 24 hours with the contents of your pack then you need to rethink your gear list.
The golden rule is to be totally self sufficient!
 |
| Ensure you have enough gear to survive 24 hours..? |
The other side of the equation is just as important..don't carry more gear than absolutely necessary. The weight will fatigue you and it will certainly slow you down. Think like a long trail hiker...carry only what you need and nothing more.
 |
| Check the weather before going out... |
...as many an Army NCO said to me, remember the 6 P's: Prior Preparation Prevents Piss Poor Performance!!!
The clothing you wear is important
You need to think about the clothing you are wearing as well as the gear in your pack. If you are a fair weather tramper then it is probably going to be technical underwear, t-shirt and shorts with outdoor shoes or boots on your feet. This will be supplemented by long sleeved tops for cold weather and possibly a warm mid layer and jacket as required.
 |
| My standard tramping attire:technical shirt, nylon shorts, tramping socks and boots |
All of your gear should be made from quick drying, wicking materials, these include nylon, polyester, merino wool, silk and bamboo. Never wear cotton...it is slow to dry and saps heat from your body when wet...keep your cotton for that summer trip to Nelson.
 |
| All of my clothing options laid out...all made from merino or technical materials |
Here is the gear I wear 90% of the time when tramping, regardless of whether it is a day or multi day tramp:
- A generic technical shirt, 100% polyester, nylon, polypropylene or merino
- Nylon sports shorts
- Polyester sports underwear, boxers by preference
- Boots, I am currently wearing Lowa Ranger III's/ Lowa Tibets . I also wear mountain running shoes on the shorter/easier trails
- Technical tramping socks: I wear Bridgedale boot socks and Icebreaker running socks, merino & technical blends by choice
- A ball cap or wide brim hat depending on the sun level
 |
| My typical summer time clothing 'system'...although I hate the term system: shorts, t shirt, boots and hat |
 |
| Protect your ears...turn that ball cap into a Kepi by pinning a bandana to the rim... |
Here is a link to a post about the JMOCS or Jon Moake Outdoor Clothing System ..hahahahahaha... I love those useless military sounding abbreviations.
Going for a short walk
There are a multitude of short walks around New Zealand which allow you to experience the great outdoors. These range from the 10 minute strolls right up to the 3+ hours tracks to points of interest. The amount of gear you take must reflect the risk factors of the track you are on. It pays to remember that the weather in New Zealand is notoriously fickle so be prepared for anything.
 |
| My daughter Juliet and I on a short walk at Mt Peel Forest in 2016 |
For any walk up to an hour you should be carrying:
- A small pack, 15-20l for carting your gear in
- A wet weather jacket, with hood, wind and waterproof
- A warm top...a 200gms fleece is good
- A warm hat: wool or fleece
- Map of the tracks you are walking
- Water bottle
- Snack foods: lunch if it is that time of the day
- A cellphone or PLB if no cell coverage
- Your wallet and car keys
This small amount of gear will keep you comfortable as you enjoy a coffee at a handy cafe, check out a track alongside a beautiful river or hike up to that iconic waterfall.
 |
| A DOC safety message in the Avalanche Creek Shelter, Arthur's Pass |
Day tramping...still requires preparation!
Going for a day tramp (i.e. more than 2 hours in duration) requires almost as much planning/equipment as a much longer trip. A higher percentage of SAR rescues are for day trampers than multi-day trampers...probably because day trampers fail to take enough gear to navigate & survive in the bush.
If something hampers your mobility then it is very easy for the dark, rain, wind and cold to take their toll.
You need to be totally self sufficient for at least 24 hour any time you are more than one hour away from civilisation.
If something hampers your mobility then it is very easy for the dark, rain, wind and cold to take their toll.
 |
| Jon on a day wak to the Lewis Pass Tops in 2017 |
You need to be totally self sufficient for at least 24 hour any time you are more than one hour away from civilisation.
 |
| Typical Day tramp gear: Pack, spare warm clothing, first aid, food/water and wet weather gear |
Here is my list of vital gear for a day tramp anywhere in New Zealand:
- Pack, 20-45 litres in volume, single compartment preferred
- A rugged plastic bag/pack liner to keep your gear dry in your pack- can also be used for an emergency rain fly if needed
- Wet weather jacket, with hood, wind and water proof
- Warm top: polar-fleece, merino or down jacket
- Wet weather over-trousers, wind and water proof
- Warm hat, merino gloves, over-gloves (I use OR brand Gortex over-mitts)
- Spare clothing: merino base layer, merino legging, socks
- First aid kit plus material for treating blisters
- Personal locator beacon, ACR ResQLink
- Map and compass or a GPS receiver
- Head torch, Black Diamond (not in photo)
- Breathable emergency bivy bag (SOL)
- Water bottles X2 (for 2 litres of water)
- A sharp knife...a little Victorix is fine not that 12" pig sticker you own...
- High energy food: snacks, drink powders, fruit, nuts, sandwiches, crackers and cheese etc.
- Sun hat, buff or cap
- Camera, car keys and wallet (an eftpos card, spare cash and drivers license)
Store loose gear in plastic bags or sil-nylon bags, it is tidier and easier to find gear inside a pack if it is tidy. I have a colour coding system:
blue=clothing, red=cooking, orange=safety gear, yellow=food, black=miscellaneous.
 |
| Warm clothing: merino leggings, merino long sleeved top, fleece hat and polypropylene gloves |
Here are some photos of this gear laid out so you can see what I carry...
 |
| My Vaude Brenta 401 day pack: wet weather gear and warm clothing |
 |
| Safety and survival gear for 24 hours...note the PLB, first aid kit and emergency bivy |
My Vaude Brenta 40l pack is exactly the right size to hold all of this gear, fully loaded it weighs approximately 4.5 kgs. Some might say this is over kill for a day tramp but I am a cautious guy and I'm often alone so I tend to err on the side of caution.
 |
| The Vaude Brenta 40L on the Bealey Valley Track, 2018 |
In the past I have also used my Brenta 50l pack for day tramps, this was the reason I brought it in the first place. It is really too big for the task...lots of empty space and extra weight I don't need to carry.
 |
| Using the Vaude Brenta 50l in the Otira Valley in 2016 |
Overnight Tramps: Packs, boots and tents...
Now we turn to overnight and multi-day tramps, obviously the length of your trip and if you are tenting or staying in a hut will make a difference to your equipment. This means a slightly larger pack is required to haul all that gear.
Again the aim is to be totally self sufficient for at least 24 and up to 72 hours.
Again the aim is to be totally self sufficient for at least 24 and up to 72 hours.
1-3 nights..light but not Spartan
Regardless of the number of nights you are spending on your tramp a lot of the gear you carry for a one night tramp is also required on a tramp up to a week in length. The main variable will be the amount of food/fuel you are carrying and if you need to carry a tent etc..
 |
| My base equipment for an overnight tramp: no tent and no food.. |
On top of the gear you carry for a day tramp you will also require the following:
- Medium/large size pack, 50-75 litres in volume
- Sleeping bag, down or synthetic, sub 1kg if possible
- Sleeping bag liner: silk is best also the lightest
- Extra clothing: a second shirt for camp wear, extra socks, spare underwear
- Food: breakfast, lunch and dinner for all the days you will be tramping in a sil-nylon food bag
- Cook pot, a fork, spoon and knife, plastic bags, Chux cloth, the pot should be around 1 litre and titanium or anodized aluminium
- Cooker, lightweight either canister gas or mineral spirits work best
- Lighters...I carry three as I often leave them in huts etc. for other people to use
- Lightweight pack repair kit: spare belt buckle, harness buckle, wire, pull ties, mesh and thread
- Toiletries: tooth brush, camp soap, comb, technical towel (small), a bandanna
- toilet paper, there is none in a back-country hut
- Hut pass or DOC hut tickets. Pay for your visit...no exceptions!
- Bug repellent and a head net (optional)
- Hut footwear- light, jandals/sandals/Crocs (optional)
- Candles for hut use (optional)
- Something to read: book or Kindle (optional)
 |
| Overnight tramp: 53L pack, wet weather gear, spare clothing... |
With a few tweaks, the gear you carry for 1-3 days is perfectly adaptable to use for 10 days or even longer.
 |
| Overnight tramp:cooking, sleeping, safety, toiletries and medical equipment |
This gear load-out is basically the same I carry while section hiking the Te Araroa Trail so in reality you could survive for a couple of months with just this gear. You have to wash clothing periodically of course although having smelt a hut full of fellow TA hikers you sometimes wonder....
 |
| My Osprey Atmos AG pack in Anti Crow Hut, on the way to the Upper Waimakariri River |
Remember: carry only what you absolutely need..do not load yourself down with soul sapping dead weight.
3+ days....more food required!
There are only a few differences between a gear list for a 1-3 day trip and a longer affair. We exchange the Osprey Atmos for either my Vaude Accent or my Osprey Volt, both in the 65-75 litre range. These are both spacious enough to allow all my gear to be carried internally.
 |
| Using my Vaude Accent on the Abel Tasman in2017 |
A tramp of more than three days will entail a massive increase in the amount of food you need to carry. While you can get by with a limited menu for 1-2 days any longer than this means you have to start thinking carefully about nutrition. You are looking at 600-750gms per day of food to keep you healthy so this means a lot of extra weight and space.
I will look at tramping food in an separate post.
I will look at tramping food in an separate post.
 |
| My base load for a 1-10 day tramp, using a tent.... |
The other item you will need is some kind of shelter; in this case a ultralight one person tent. Even if you intend to stay in a hut you must have some form of shelter...you may not make it to the hut or it might be full. It is no fun sleeping outside in the rain with no over head shelter which happens more often than you might think.
If you are using a tarp or tent then of course you also need a sleeping mat and a ground sheet. I use a piece of Tyvek for a ground sheet, this is waterproof and protects my floor area. I sometimes carry a rain fly but most often use a 1 person tent.
My main tent is a Big Agnes Copper Spur UL 1, my sleeping mat is a Pacific Outdoor thermal insulated mat.
 |
| My two person Luxe Firstlight tent set up at Bay of Many Coves campsite, QCT |
If you are using a tarp or tent then of course you also need a sleeping mat and a ground sheet. I use a piece of Tyvek for a ground sheet, this is waterproof and protects my floor area. I sometimes carry a rain fly but most often use a 1 person tent.
My main tent is a Big Agnes Copper Spur UL 1, my sleeping mat is a Pacific Outdoor thermal insulated mat.
 |
| My Big Agnes Copper Spur UL1 set up in Totaranui Campgrounds, Abel Tasman NP |
Here are some photos of the gear laid out prior to a tramping trip..
 |
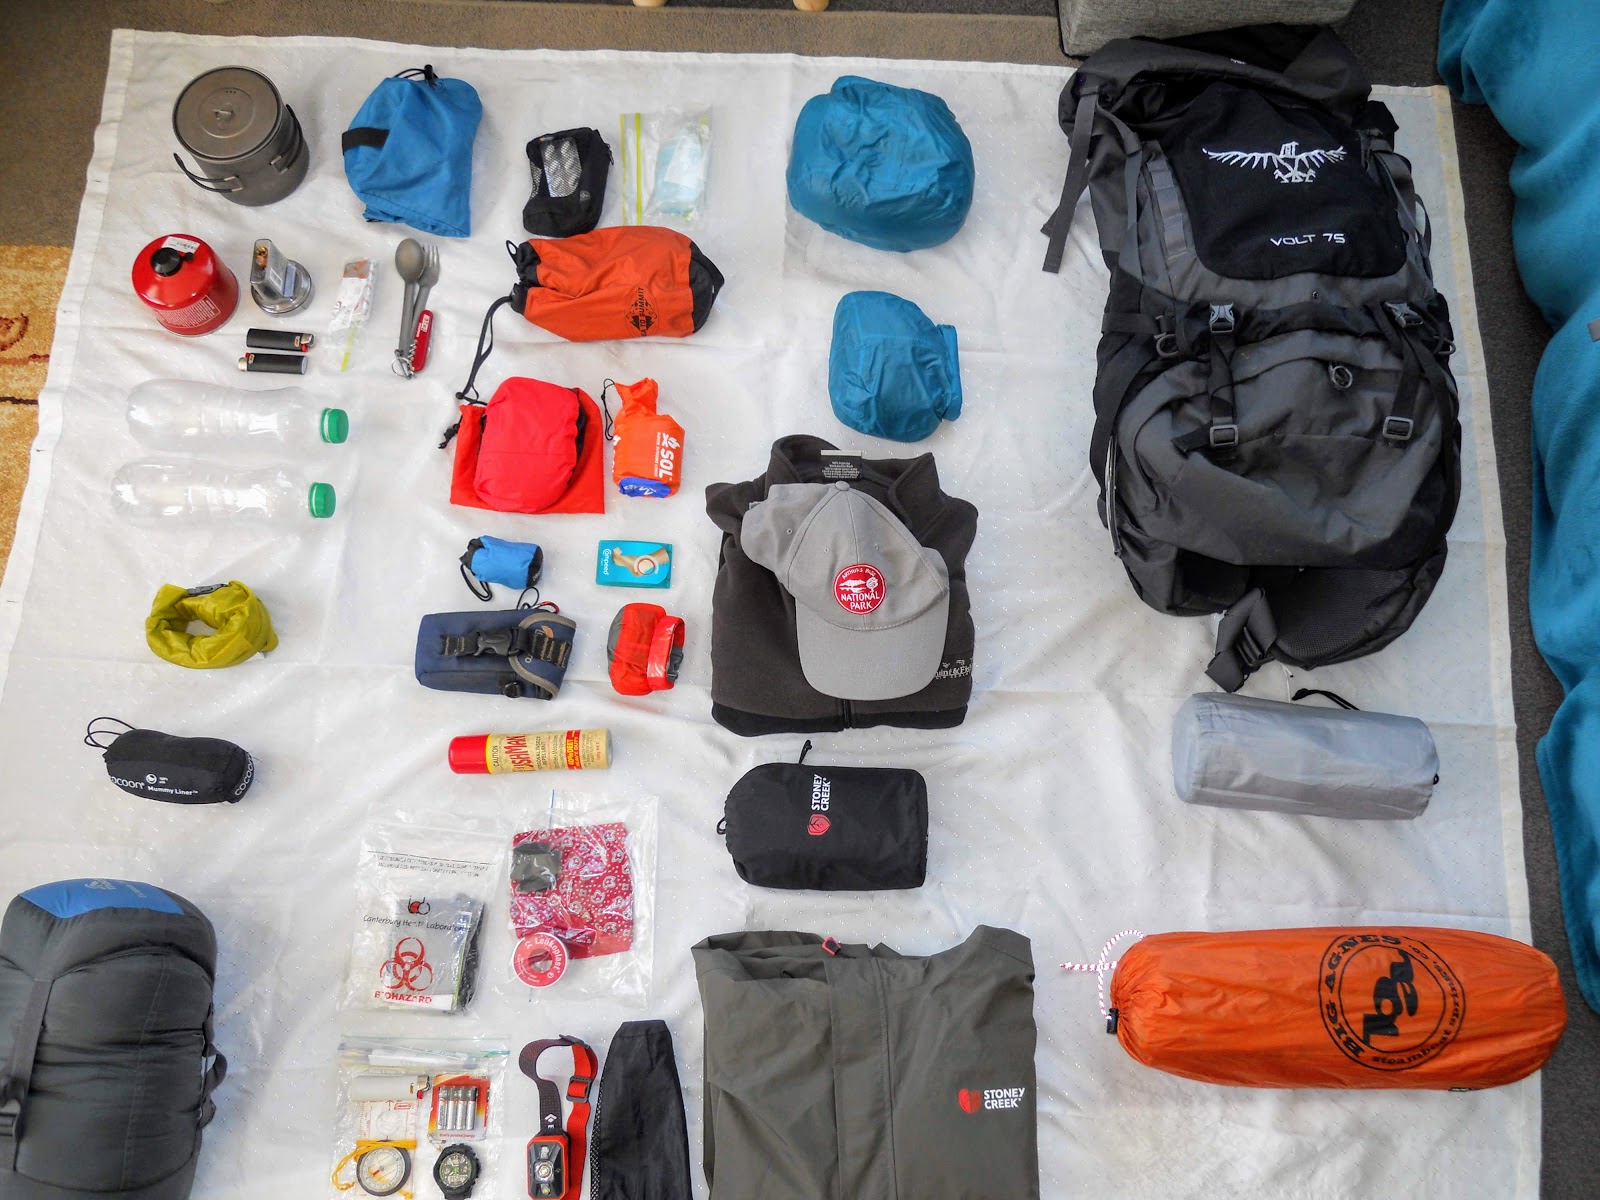
| Overnight tramp: 75L pack, wet weather gear, spare clothing, tent, ground mat... |
 |
| Overnight tramp:cooking, sleeping system, safety gear, toiletries and medical equipment |
My main multi-day pack is a Osprey Volt 75 (1.75 kgs), this has been my main heavy load carrier since the beginning of 2018. It is super comfortable, roomy and can easily hold up to ten days worth of food and gear.
 |
| My Osprey Volt on the track to Speargrass Hut, Nelson Lakes NP |
 |
| Carting the Osprey Volt on the Abel Tasman Coastal Walk in September 2018 |
My other pack in the 'big load' category is a Vaude Accent 65+10 litres (2 kgs), this was my main overnight pack from 2011-2017. I still use this on occasion but it is hard to argue with the 300gms weight difference between the two packs.
The newer Osprey pack is much lighter and more comfortable to carry.
 |
| My Vaude Accent pack in the East Hawdon Valley, 2013 |
To recap, extra gear you need for for a +3 day tramp:
- Shelter: tent, bivy bag or tarp or you can sleep in a DOC hut if available
- Sleeping mat, insulated
- Ground sheet for the tent/tarp: store brought, Tyvek, plastic sheeting or space blanket
- A LOT of food...the main weight of your pack really
I hope that provides some useful guidelines on what you need to carry.
 |
| Jon atop MacKinnon Pass, Milford Track in December 2018 |


