Showing posts with label camp cookery. Show all posts

Thursday 11 March 2021

Rations for walking the Kepler Track...

 ...Vitamins for Victory...

I'm off soon to tramp the Kepler Track in Fiordland National Park from the 22nd-25th of March (in two weeks time). I've been finalising the preparation for what will be my last of the Great Walk including the food I intend to take with me. The track is three nights and four days so I have prepared breakfast, lunch and dinner meals for the duration of the tramp. 

Looking towards Mt Luxmore from the Te Anau foreshore...


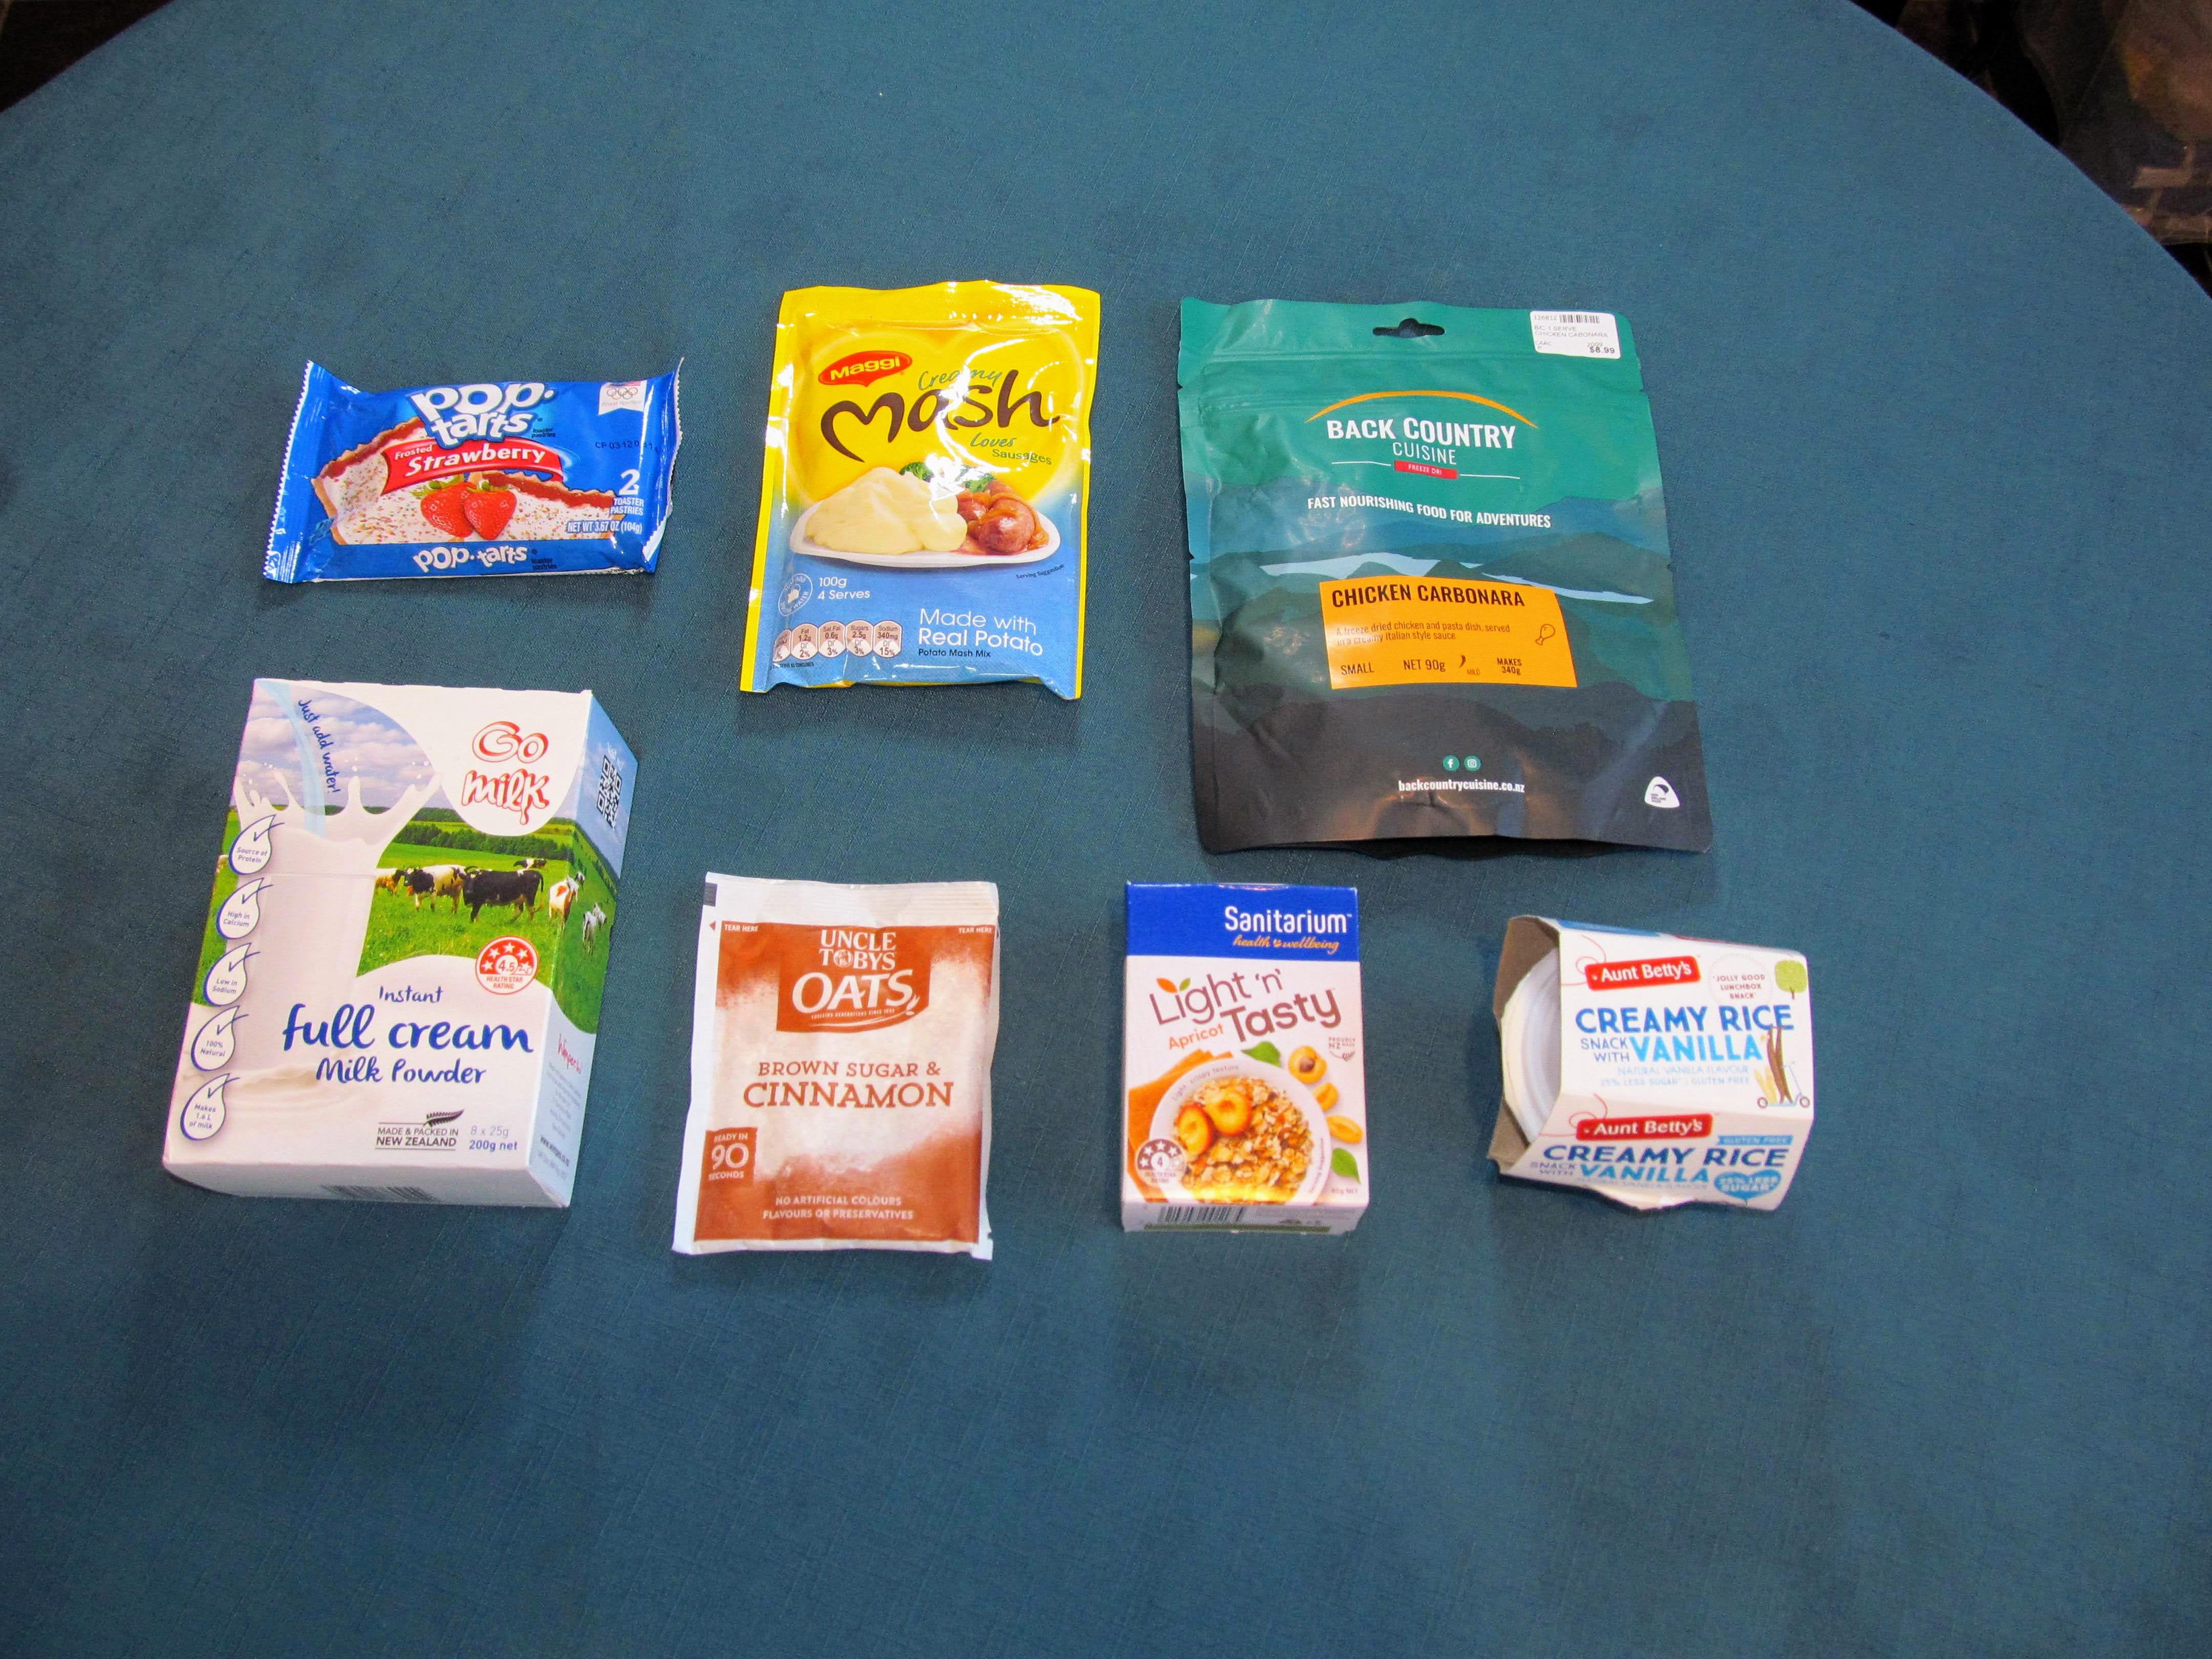
I thought it might be informative for you to see what I am taking with me to fuel me through this adventure. I am following my golden rule of 500-700gms of food per day with a mix of carbohydrates, protein, fat and sugar to sustain me. 

My daily rations for the Kepler Track in late March


BTW...I always find my blog posts about tramping food (i.e. food porn.....and now we add the cream fraise...) are the most popular ones. You dirty beggars...you just want to peep at me vittles !!!!


My food rations for a three night Great Walk...

I have talked about my tramping menus a number of times now so I will not go into too much detail. Basically my method is to pack homemade daily rations in a zip lock plastic bag with all the food I will be eating on that day. This actually helps to control your daily food weight and makes it easier to avoid eating all your food in the first couple of days.
 

All my Kepler Track rations set out on the table...


These rations go into a lite weight sil-nylon bag I use for my food and only get taken out when I arrive at my destination for that night. The bag keeps everything together while also providing some protection from moisture seeping into or out of the food. 


My 13 litre sil-nylon bag can hold 7 days of food...

I have been using this same bag for my on track food storage for over five years now....it is still going strong.


Day 1: Te Anau to Luxmore:

The first day features a long walk and a big climb right at the end.. when I get to the hut I will be tired and hungry so something easy to prepare seems in order. Instant Mac n' Cheese can be cooked in under five minutes and it is always one of my trail favorites. I will add some chunks of Baby-bel cheese and a sliced up bierstick for more flavor. 

Ration Pack One.....Mac n' Cheese main

Ration contents: 645 gms (total weight)

Dinner: Kraft Mac n'Cheese, Chicken Cup-o-Soup, Hansells Peach Iced Tea mix, Whitakers Sante Bar
Breakfast (for next morning): Cream of Wheat (sugar, milk powder and dried fruit), 3 in 1 Nescafe coffee with sugar, Jack Links steak bar
Daily snacks: Raisins, peanut brittle bar, Snickers (not seen), Pure hydration drink mix
Accessories: Salt, pepper, Aquatabs, sugar sticks, Chux Cloth, thin plastic freezer bag, pot scrubber, 


Each of my ration packs hold a snack sized zip-lock bag with a range of condiments inside...salt, pepper, sugar and a 3 in 1 coffee for the next morning. I am not a big coffee drinker but I do like some with my breakfast in the morning. Not that my lovely partner Karen would call it coffee...more like muck and rakings off the floor!

Hey...it's hot...it's brown...it's sweet...I'm good to go!!!


The condiments pack in this homemade ration...

 I also include Aquatab water purification tablets as a back up if my Sawyer Squeeze water filter gets broken. This is just about the only redundant item I carry...the only other item is several fire-starting methods...a lighter, matches and a ferro-rod. 

Day 2: Luxmore to Iris Burn:

Day two is a six hour trip across the tops with two emergency shelters along the way so I will be able to stop at one of them for some food, a drink and respite from the elements. I am carrying freeze dried meals for the second and third nights of my trip. 

I have my favorite Backcountry meal Beef Stroganoff for dinner on day two. 

Ration Pack two: FD Beef Stroganoff main


Ration contents: 645 gms (total weight)

Dinner: Backcountry FD Beef Stroganoff (sml), Trident chicken simmer soup, Vitafresh navel orange drink mix, Whitakers Sante Bar
Breakfast (for next morning): Instant Porridge (sugar, milk powder and dried fruit), 3 in 1 Nescafe coffee with sugar, Jack Links jerky bar
Daily snacks: Le Snak, muesli bar, fruit leather bar, Pure hydration drink mix
Accessories: Salt, pepper, Aquatabs, sugar sticks, Chux Cloth, thin plastic freezer bag, pot scrubber, 


I have started using one serve Backcountry meals as I found the two person serves too large to eat in one sitting. I tend to rotate my freeze dry companies...Radix is the best followed by Absolute Wilderness, Outdoor Gourmet and Backcountry. This time around I had Backcountry meals as I brought a few in the Hunting and Fishing summer sale. 


Condiments pack for this ration...

I am also using the Trident brand Asian simmer soup packets...they are great as they are light and full of flavor. I like the Thai Chicken Noodle and Tom Yum Goong flavors. You can actually just add these to a half pot of hot water and leave them to rehydrate as they contain rice noodles. No cook time is necessary...

Day 3: Iris Burn to Moturau:

Day three is a big walk down the valley of the Iris Burn River....16 kilometers of mostly flat travel over 5-6 hours. I am hoping to get to the hut early so I can do the 45 minute side walk down to Shallow Bay Hut on Lake Manapouri. I might just visit it on the way out to Rainbow Reach on the last day...I haven't decided yet. 


Ration Pack three: FD Sweet n' Sour Lamb


Ration contents: 597 gms (total weight)

Dinner: Backcountry FD Sweet and Sour Lamb, Tom Yum Goong simmer soup, Vitafresh Lemon Iced Tea drink mix, Whitakers Sante Bar
Breakfast for next morning: Instant Porridge (sugar, milk powder and dried fruit), 3 in 1 Nescafe coffee with sugar, Jack Links jerky bar
Daily snacks: Jack Links steak bar, cashew nuts, muesli bar, Vitafresh hydration drink mix
Accessories: Salt, pepper, Aquatabs, sugar sticks, Chux Cloth, thin plastic freezer bag, pot scrubber 


I have Backcountry Sweet and Sour Lamb for dinner this night and Trident Tom Yum Goong soup. This is the last night of my trip so if I am hungry I may eat my emergency food as the last day is a relatively easy 1-2 hour walk to the road end. I would be unlikely to need it after day three...


...condiment pack with this ration...


I like to have some protein for sustained energy with my breakfast...I used to eat cheese but now I usually have a Jack Links steak bar or jerky stick. I buy the 3 in 1 coffee sachets from Asian food markets and they always seem to have a range of flavors and brands. Oldtown and Nescafe both go down well, Oldtown tastes like coffee with condensed milk in it. 


Day 4: Moturau to Rainbow Reach:

The last day is a short one....only 1.5-2 hours of walking from Moturau Hut to the pick up point at Rainbow Reach. I will be carrying breakfast for this day and a couple of snacks but no food for a midday meal as I will hopefully be back in Te Anau before lunchtime. 

Day four: snack pack for the short day...

Ration contents: 160 gms (total weight):

Daily snacks: Raisins, peanuts, Jack Links steak bar, Cheez-it crackers
Accessories:  Aquatabs (4)


I like to rotate my snacks to stop food fatigue and favor a savoury mix over sweet. No trail mix...I cannot stand the stuff anymore and these yoghurt covered apricot muesli bars are just about the only I will eat. I will also eat any left over lunch items on the last day as I will want to use it rather than throw it away. 


...all the items in the snack pack for day four....


That is the main load-out of food I will be carrying on the Kepler Track but there are a number of supplemental items I will have with me on this trip. 


Supplementary items.....

I always carry a few supplementary items with me when I go out on a multi day tramp. There are items you don't really want to portion out or those that you may or may not use but still need to carry. 

 I usually pack my food bag in the bottom middle of my pack so it is not readily to hand unless you deep dive into your pack. You want to keep your pack contents dry so opening it on trail especially in a rainstorm is not something you want to do.  


My lunch will be crackers and Biersticks....or wraps..


I will pack my lunch items in a separate plastic bag and store it at the top of my pack outside of the pack liner bag so I can access it when I need too. I haven't decided on wraps or crackers to go with my lunch time cheese and salami...I will let you know which.


...and some Babybel semisoft cheese...


Next is an emergency days worth of food in case I get stuck in a hut because of extreme weather or some other calamity. Not a full ration...this usually consists of a packet of oatmeal, a 3-1 coffee, some muesli bars and a freeze dried or lite main meal. I'm taking more than usual on this trip as there are often snow falls on the Kepler Track at this time of the year. 

My emergency rations for the Kepler Track

Emergency food: 380 gm's total weight

Breakfast: Instant porridge packet
Lunch: Cup-o-Soup, muesli bar, peanut brittle bar
Dinner: Backcountry FD Lamb Fettucine (sml)


The emergency ration is at the bottom...


I often use couscous, instant potato or polenta for emergency food as all of these are low bulk and low weight. Rice noodles and Ramen are also a good choice or you can take a small freeze dried meal. 


A variety of breakfast items I have used before...


Some items I have used for tramping mains in the past....


I always carry a brew kit with tea/coffee/sugar substitute for daytime drinks. I will be carrying my Firemaple Ti stove and a 100gm gas canister with me on the Kepler Track at a total of 145 gms...

My brew kit...Chanui Earl Grey is my tea of choice....

Jon's cook kit including the Ti stove and small gas canister...


I have also started to carry an assortment of instant soup packets for those colder days out on a track. I noticed one of the people doing this on the Paparoa Track...they had an assortment of flavors in a small bag so I am going to try it out. I have Tomato, Cream of Mushroom, Dutch Curry Rice and Pumpkin in this pack. 


Supplementary soup packets from Continental & Maggi....

...each daily ration also contains a simmer soup...


I am hoping for a successful trip and a fitting end to my Great Walk tramps after nearly 30 years of working through them. I may revisit a number of the tracks in the future but I think it might be time to start ticking off those other classics like the Greenstone-Caples, Rakuira Northwest Circuit, Hollyford, Richmond Alpine Track and Tararua Southern Crossing....

Postcript: the leftovers.....

Well my trip to Fiordland was a success with the Kepler Track finished and the final of the ten Great Walks ticked off my to do list. It was a great trip and I thought I would have a look at the food items I did not use on this trip. 

Soup, tea and crackers on arrival at Luxmore Hut, Kepler Track

There are always food items left after every trip...sometimes you over estimate how much food you will need or you didn't feel as hungry as you thought you might. Sometimes you are so tired you just cannot be buggered to eat everything. The Kepler Track is actually quite a hard track especially the first two days with huge climbs and descents over the day. I arrived at both Luxmore and Iris Burn Huts knackered so I wasn't all that hungry.


Tucking into a soup and freeze dried meal at Luxmore Hut, Kepler Track

If we look at the food left over from the trip it is basically my emergency rations and some drinks that were not used. I was expecting rainwater tanks at Forest Burn and Hanging Valley Shelters but there is no water at either of them. This meant I had to conserve water for drinking and not use it for hot or sweet drinks. I also ate less snacks on the track as the last day was a short one and I basically didn't have time to stop and eat them as I was in a race to catch the 10am shuttle. 


No water at Hanging Valley Shelter...

I ate all my freeze dried meals over the Mac n' Cheese...they are easier to prepare and do not require as much clean up. The extra Cup-o-Soup were a good idea and one I will continue from now...I used them in favor of the Trident simmer soup. Things I would have liked....I saw several people eating Mandarins on the track and they looked good...I might take some with me next time I venture out. 


The ration items I did not eat on the Kepler Track


As expected I think I more or less had the right amount of food with me...I have been at this lark for a while now so I think I'm getting good at planning menus.


Every track an adventure...every hut a palace...every meal a banquet...

Thursday 4 February 2021

Tramping mugs...which one is for you?

What makes for a great camping mug?

One of the great pleasures of tramping and other outdoor activities is sitting around with a group of like minded people and chatting about life, love and the general state of the world. These types of encounters are always enhanced with some kind of drink in hand and make the physically demanding rigors of walking for hours carrying a pack more bearable. 

Hut life...a mixed group enjoying the pleasures of the hut....

The beverage you are consuming could be hot or cold...alcoholic or teetotal but the one thing they all have in common is they need some sort of drinking vessel to hold them in. A cup or mug suitable for holding a variety of liquids is one of the most important pieces of kit you can carry. What is that morning cup of coffee without a sturdy mug to hold in your hands....?

A tasty pre dinner Cup-O-Soup at Wharewharangi Hut


I have used a multitude of different cups and mugs during my tramping adventures and I thought it might be a good idea to look at what makes a great tramping mug. We will also look at some different materials used for cups/mugs and discuss their pros and cons. 


Jon enjoys a pot of tea at North Arm Hut, Rakuira

Finally I will discuss what I personally carry when going out into the backcountry. 


What constitutes a great tramping mug?

Before discussing materials and product options I think we should first consider what makes a great drinking vessel for tramping. Different people will have different criteria depending on the type of tramping they do, the style of their outdoor adventures and how much they are wiling to carry. For example a ultra light long trail walker will probably drink from their cook pot (if they even have one) whilst your cyclist, kayaker, car camper or 4 W/D enthusiast has a vehicle to haul heavier items in. 


Using my cooking pot as a tea cup...John Tait Hut, 2018


I have a hierarchy of criteria based on my own needs which dictates what I am carrying and they fall into the following areas:


1. Weight: How heavy is the item and is it heavier than necessary or can I find something lighter? This will be dictated by your tramping style to a certain degree. You should always try to minimise weight when purchasing new outdoor gear. Extra weight leads to more fatigue, slower pace and a less enjoyable tramp. 

2. Purpose: What do I need it for and can it fill more than one purpose negating the need for extra equipment? What is it going to hold..cold and hot drinks, soup, cold soak, cooked food etc?  Can it be used for multiple outdoor activities? A multipurpose piece of kit is better than one with a limited set of uses...

...multi purpose gear...using a large metal mug as a cook pot.....


3. Material: I mostly tramp/walk which means bashing, drops, knocks and general rough handling conditions. Anything I carry must be sturdy & rugged enough to survive the hard life it is going to endure. Don't go overboard here...it doesn't have to last for 40+ years but it should survive me dropping it on the hut floor a couple of times. 

4. Size: What size of mug do you need for the adventures you undertake? Do you enjoy massive cups of coffee of a morning or just a stronger thimbleful?  Will your mug have a second role as your food bowl? You should probably go for a larger size so that it can be used for a multitude of uses but be cognizant of weight issues... 

BTW: in JonWorld (TM) an oversized tea cup is actually called a BBT or Big Bastid Tea...just so you know...

Now that is one big bastid of a tea mug.....


5. Cost: This is a lesser concern but do I want to spend lots of money on a super-duper branded item or can I buy something similar from a chain retailer for much less. Don't spend big on those ancillary items...plates, cups, basic clothing etc. Spend your money on the essential items (pack/mat/sleeping bag/wet weather gear/boots) which favor using quality brands. 

6. Ascetics: This is not important to me but a lot of people must have the right shape, color, size, design. I could honestly care less...if it does the job I'm quite happy to suck my Lifers Juice out of a pink princess cup.....


What you are looking for should be a combination of all these factors which addresses most if not all of them. You will probably need to compromise as very little equipment is going to perfectly fit all your criteria..just get as close as possible.  


Types of drinking vessels for tramping.....

There are a variety of materials used in the production of outdoor drinking vessels but some materials such as glass, ceramic, bamboo and wood are not suitable mainly due to weigh and durability issues. The vessels commonly used basically break down into three main materials. These are metal, hard plastic and soft plastics (such as silicone).

Enjoying a brew at Totaranui Campgrounds in 2019

 Lets have a look at each of these in turn and consider their good and bad points. 


Metal mugs:

Metal is an excellent material for outdoor cup ware as it is rugged, easily cleaned, cheap and durable. the main problem with metal cups are that they tend to be heavier than plastics and they conduct heat well which means you often burn yourself on them. Many different metals are used: aluminum, tin, stainless steel, titanium and enamelware. Prices range from just a few dollars for cheap enamel mugs up to $50 for a quality branded titanium mug. 

'Brewing up' in the bed of the Blue Grey River back in 2015

One of the iconic items of Kiwiana is the enameled metal cup. These have been a fixture of the backcountry and outdoor living for as long as Europeans have lived in this country. Made by many companies they are great as a camping mug as the enamel makes the metal less likely to burn you. They are also very hard wearing, easy to clean and cheap. 


A typical cheap enamel mug...

You often see people (especially older trampers) using these mugs in huts and at campsites. 

An enamel and a stainless mug at use at Onetahuaiti Beach...

Another option is one of the many different types of cup-canteen used by military forces around the world. Made of heavier grade aluminum or stainless steel they are made to be carried in webbing gear with an integral water bottle. I have one from my Army days which was manufactured in 1972 so it is nearly 50 years old and still as good as the day they made it...


Military style cup canteen (US Army circa 1960-1990)

The handle often folds down or under the cup canteen making them a smaller item to store. These may double as your cooking pot which negates the need for another piece of kit. I have seen modern iterations of this in stores recently...Gerber/Bear Gryyls was one of the brands also Coughlin's, Esbit and no name Chinese knock offs.

A Gerber/Bear Gryyls cup canteen


The most regularly seen mug is one of the many metal camp mugs made by just about every outdoor retailer in the world. If using a metal camp mug it is a good idea to look for a double skin version as they will allow you to drink without burning your lips. They are also slightly insulated so will keep your drink warm for longer. 


A cheap Campmaster brand mug from Mitre 10 Hardware

Any of these mugs would work a treat outdoors but we should also consider the other material camp mugs are often made from which is plastic...


Hard plastics mugs:

Most people today will be using some form of plastic cup or mug when they are out on their outdoor adventures. Plastic is an ideal material for camp ware...it is light, durable, easy to clean and cheap. You can spend as little or as much on a mug as you like.


A white plastic mug I have used in the past...
 

Possibly the cheapest option is to go to a big box store like the Warehouse, Briscoes or even the local supermarket and look at what they have to offer. I have a white plastic K-Mart mug I sometimes take on trips that cost me $3 NZD and it works fine. Have a look around home...I bet you have one of these mugs in the cupboard...

A cheap hard plastic mug from a chain store...


If you wanted to go a bit more upmarket you might look at one of the cheaper outdoor stores like Mountain Equipment or Hunting and Fishing. These stores sell all types of outdoor cook ware...the melamine mug below is from Mountain Equipment and costs only $6. They are usually more colorful and show purpose design features.


Melamine mug from Mountain Equipment

If you are a total gear head then the sky is the limit...you can spend up to $100 buying a outdoor mug (don't...that is stupid money for a plastic cup...) from a brand like Kathmandu, Macpac, Sea to Summit, REI, Marmot, GSI, MSR etc. etc. A Sea to Summit X Mug or Thermo Mug will retail for around $15-$20 and some of these fancy ones will have lids, thermal sleeves, volume graduations etc. 


A Sea to Summit Thermo Mug


Are they any better? No...not really...they are branded but they basically do the same job as that cheap $3 dollar K-Mart mug. If buying a hard plastic mug just be aware that it will get bashed around a lot on trail. Try not to buy very hard plastics like Melamine as they easily shatter. The mug should have a degree of flexibility so a semi hard plastic is the best base material.


Soft plastics:

Aside from hard plastics there is a growing range of softer silicone based mugs and cups on the market. The premium brand in this area is Sea To Summit with their X-Cup and X-Mug range. The body of these are baffled, folding silicone with a hard base and lip. When stored they make a neat round package about a cm thick and they unfold into a 250ml or 480 ml drinks vessel.


Sea to Summit X-Cup


There is a whole range of this folding camp ware from Sea To Summit; cups, mugs, plates, bowls even metal bottomed pots/pans/kettles. The main advantage of this system is the small size of the folded item...it will easily fit under the cook pot in your cooking gear storage bag. 


The whole Sea to Summit X range of camp ware


UCO use a similar idea but with their own particular twist...their cups/mugs have a solid top and handle and a folding bottom. This means they are easier to hold and drink from but with the added space saving aspect the folding bottom provides. 


A UCO collapsible mug in silicone and plastic

Here is another example of folding cup used by the British Army....the top of these silicone mugs fold down into the main body. This makes them smaller and easier to pack into a mess kit or cook pot. Not a bad option...I have used one of these before and it works adequately enough to be considered. 

Collapsible silicone mug as used by British Army

The main downside of all of these mugs is durability...these will not last as long as a metal or hard plastic mug. They can also be more difficult to use as the heat is more readily transferred through the material...you might burn yourself with these. The constant folding/unfolding is likely to cause splits especially on the ones which have baffles. 


Thermo flasks:

We should not forget the thermos flask as a possible outdoor mug...when I talk about thermo flasks I really mean those thermo travel mugs you get for coffee and other hot drinks. 

A Kathmandu thermo travel mug.....

They actually make good camp mugs as most of them are made from light materials, they are durable and most have a lid to keep the heat in. If you are going to use one of these have a really good look around and find one that is as light as possible. 


Thermos coffee travel mug...


You shouldn't discount actual flasks either...there is a bewildering range of them available in many different shops and they work well to keep hot drinks warm and cold drinks cool. 


A metal thermal vacuum flask...


Again look for as light as possible and make sure the inner is metal and not glass as the glass ones break very easily. 


Karen's thermal flask in use in Hanmer Forest Park

Thermos Flasks also have a time and place in the outdoors but they tend to be very heavy so they are not suitable as a mug for trampers and hikers. These are excellent for holding a brew/soup on a day walk or casual stroll...Karen has a quality Stanley flask that will keep the contents warm for up to 6-7 hours....


Classic Thermos flask....


So now we have looked at materials and types of mugs let us look at what I am currently using when I go on my outdoor adventures.


What I use when tramping....

My gear is constantly changing and evolving...I think about how my gear has performed after each trip and if it is not ideal I look for an alternate. I have also started to swap out my initial gear with newer better equipment as finances allow. 

This is my currently gear load:


Sea to Summit X-Mug: 

Karen brought me a new tramping stove for Christmas so I brought myself a new folding X-Mug to go with it. These mugs are made of silicone with a solid base and rim and fold down to a disk about a cm thick and it fits perfectly on top of my stove in its storage bag. Yet to be used in the field....I brought mine from Bivouac Outdoor for around $20.

Sea to Summit X-Cup...open and folded closed

The Sea to Summit X-Mug 


Sea to Summit Delta Mug:

I replaced my metal camp cup with a plastic Sea To summit Delta Cup early last year so it went on all of the overnight trips I undertook in 2020. It is an excellent mug...thick enough to let me hold hot drinks, tough, easy to clean and it has graduations on the inside for measuring hot water for meals. I will continue to use this mug and in fact I have brought Karen one as well....


A hard plastic Sea to Summit Delta Mug...


Here are some photos of the Delta Mug in use...


Its propping up my Cheez-its but you get the idea...

Breakfast of champions...O-Meal Hashbrowns and coffee!

Brew time at Moonlight Tops Hut on the Paparoa Track

A mug of soup with dinner...Luxmore Hut

This is my main mug for overnight and multiday trips using my lite cooking kit...they cost from $12-$20.


Kiwi camping metal mug:

Prior to the Delta Mug I was using a double walled Kiwi Camping metal mug on my outdoor adventures. It had accompanied me on a number of trips over the years but has been relegated to my day pack as a mug for tea, soup etc. when out day walking. 

Morning coffee at Howdon Hut in late 2019...

Having a brew in my Kiwi Camping mug..

Dinnertime at Woolshed Hut in 2020...


A perfect example of why this material makes for a good mug....


Toaks TI 1.3l pot:

In an effort to lighten my load I sometimes just leave the mugs and plates etc. at home and eat/drink straight out of my cooking pot. My main pot is a Toaks Titanium 1.3 liter pot...it certainly fulfills the role of Big Bastid Tea vessel very well...

Boiling water in my Toaks Ti cook pot....Hawdon Hut

My lite weight cook kit in action at Bark Bay Hut, August 2020

I'm getting old now and I prefer the comfort and class of drinking out of a mug and I actually enjoy not burning my lips on the edge of the pot....


Generic thermo mug:

Karen and I brought a couple of cheap metal thermo mugs for use when we go camping and tramping. We have used them a couple of times on day walks...they are excellent camp mugs as they have a lid to keep the contents warm and they keep bugs out of your brew. 


Using my travel mug at the Pororairi River in 2020

Well...hopefully that will help some people decide what kind of drinking vessel they will carry when they head outdoors. 

BTW: I am walking the Paparoa Track next week so come back soon for some new Trip Reports including this Great Walk track...