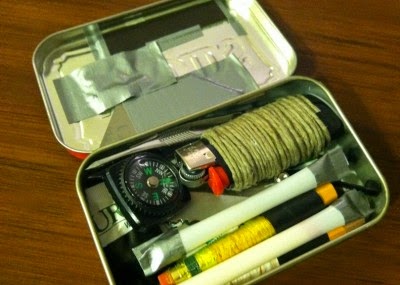
One kit to save them all...
A popular challenge within the outdoor community is to build a small and thorough Survival Kit. Building a kit of this type is an interesting project with some very valuable rewards. First, it’s fairly inexpensive to build. Second, it puts you in the survival mind-set and forces you to think creatively about how and what you need for surviving. The small size of the kit helps you get your priorities straight real fast.
Using the kit
Small survival kits are perfect for carrying at all times. They are small & lightweight and fit in a small bag or jacket pocket. If you are going on a day walk or you take your pack off carry your survival kit with you. I chuck mine in my pocket EVERY time I walk more than 5 metres away from my gear.
My lightweight Survival Kit
I have use an old Dunhill cigarette tin, but any small light metal tin will work. I have sealed mine with insulation tape. The kit needs to be sealed to stop water getting in, you only open it when you have an emergency.
 |
| My wilderness survival kit |
Below are my general thoughts about the main contents of the kit:
Fire Starting:
I like to pack at least 2 methods for starting a fire. I packed in 4 waterproof matches and taped a match strike strip on the underside of the lid. I also packed a mini "Bic" lighter and 2 different types of tinder – 1 cotton based and some old bicycle inner tube.
Cutting Tool:
A sharp blade is useful: a small folding knife, a razor blade or small Exacto blade. I have a small 27 gm Gerber folding knife in mine. For it’s size, it is a very solid and reliable knife. It’s perfect for many typical camp/survival/bushcraft chores. I have also taped a box cutter blade to the lid of the tin.
 |
| Survival kit contents: Gerber Paraframe I |
Signalling:
In my opinion you can use the tin itself for signalling. It’s not quite as shiny as a mirror but should do just fine. Just buff up the inside silver a bit and you’re ready to go.
Whistle:
I have a small survival whistle in my kit which I received free with a first aid/survival kit I brought for my car.
 |
| Survival whistle similar to my own |
Compass:
This is an important item, you should pack a small compass! You can often find one of these on a cheap key chain or purchase one. Mine came free with a Vaude pack I brought in 2014.
 |
| Free Silva button compass |
Duct Tape:
Very useful survival tool for cordage or random repairs to everything. You can tear it into strips to add length. I wrap a couple of meter's worth around my walking pole but also have a small rolled up length in my survival kit.
 |
| Survival kit contents: Duct tape wrapped around trek pole |
Needle & Thread:
Use these for clothing or gear repair. Pack a strong nylon thread – it can double as fishing line, snares or other cordage needs.
Thin Wire:
Think picture hanging wire thickness...you can use this for snares, repairs and many other applications. I have about 1.5 metres in my kit, I wrapped it around 3 fingers and then tied it off to take up less space.
 |
| Picture hanging wire...$7 NZD for 7 metres at local store |
Safety Pins:
Can be used for temporary clothing/gear repairs and as an emergency suture (ouch!!!...I have had to do this on someone before...not pleasant!).
 |
| Safety pins: fish hooks, clothing/gear repair and suture all in one! |
Fishing Hooks:
Self explanatory – you can a pack a few sizes for birds/fish, etc…you will probably never use them but they are a worthwhile addition.
Flash-light:
A compact button LED light is a good addition. These are bright and cheap, they also last a long time. Some people prefer to pack small candles.
Water Purification:
You can boil water in the tin itself. I prefer to pack 4-6 chlorine tablets. It takes 1 tablet to purify 1 litre so 4 tablets can purify 4 litres of water.
 |
| Aquatabs: Chlorine based water purification tablets |
Medical Supplies:
Adhesive bandages are small and easy to pack. I also pack 2 pain reliever pills and alcohol wipes for disinfecting a cut/wound.
Note Paper & Pencil:
You never know when you need to leave a note. I bought a pad of waterproof paper and cut it to size to fit my tin. Also added a small HB pencil to write with.
Other Random Items:
Salt Pack – take with water to fight dehydration.
Sugar Pack – take for quick energy
Paper Clip – use a binding/button/hook/light weight 'biner etc…
Barley sugars– quick energy (or some other hard candy)
Medication – any necessary medication you need
 |
| Classic fare: Heards Barley Sugar |
The Tin Container Itself:
The tin itself is both a container and part of your survival kit. You can use it:
- to make char cloth
- as a drinking/cooking/boiling container
- as a signal mirror
There are countless other items to consider packing in a mini survival kit. As long as the key survival bases are covered, your creativity is the limit.
These are suggested guidelines only…there are no right and wrong contents. If you think it is important then add it, just try to keep it lightweight.
Remember....it’s YOUR kit.
Remember....it’s YOUR kit.

No comments:
Post a Comment